 Colourful Corner to Corner Crochet
Do you like my new colourful crochet bag!?! I love love love it!! It is made using the corner to corner stitch (or C2C, as it’s frequently called) and is based on a Granny Hotchpotch bag I made a couple of months ago. Here it is…
Stashbusting Crochet Projects
The idea for both handmade bags is for them to be the ultimate crochet stashbusters. You know the sort of thing, all those yarn scraps you saved and don’t know what to do with but don’t want to throw away. I knotted loads of straggly ends together using the magic knot and just got hooking. No particular plan was followed, it was very much a winging it sort of craft project.
Both the crochet bags are made using my leftovers of Paintbox Simply Aran acrylic yarn but you can use pretty much any woolly stuff you want. It’s a hotchpotch of stuff, see?!


Notes on Winging a C2C Crochet Bag
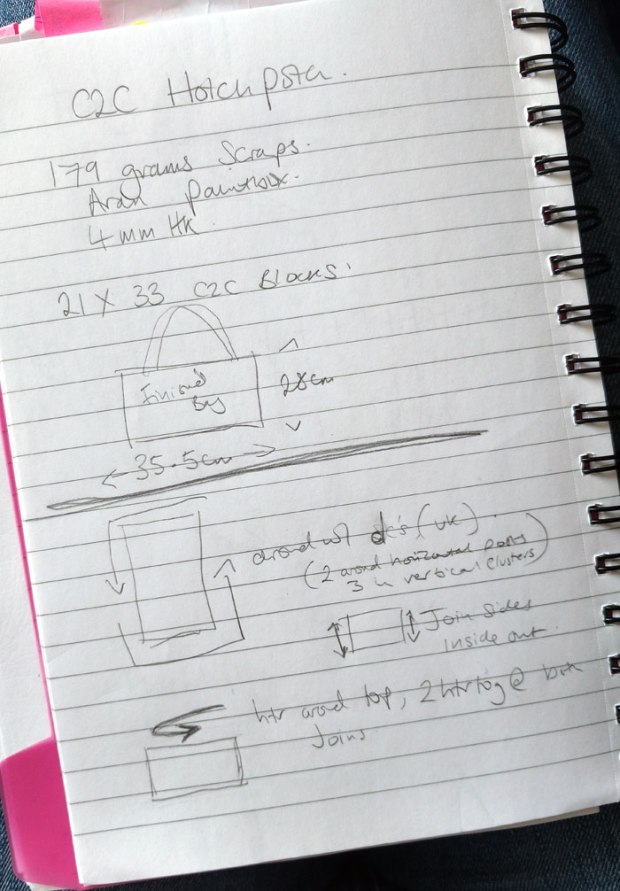
Below I have added the notes I scribbled out in the hope that these will give you a better idea of what’s what. It also provides a peek inside my crochet designer brain. Although, that’s not necessarily pretty but ah well!!
I’m not writing a specific pattern for this one because, if you know the basic Corner to Corner stitch, you already know how to make this colourful crochet Hotchpotch bag. However, before you disappear, I will tell you that I have other patterns and tutorials that show you how to C2C. Check out my free crochet patterns to find some lovely examples, and also my YouTube channel.
Info for How to Crochet a Stashbusting Bag
- For a useful video tutorial on how to crochet the granny stripe bag go HERE. I demonstrate the magic knot technique and give a bit of advice about lining and zips, which you can apply here.
- To hear me gush about my Hotchpotch C2C bag, go here to YouTube for my crochet podcast
- To hear me go into a bit more detail about the granny version go HERE for another podcast episode
- I bought the bag straps from Amazon. Blue ones HERE. Brown ones HERE
- Adding the handles is pretty simple. Line them up evenly and it’s just a question of adding a few stitches through the holes. I recommend reinforcing these by stitching through a layer of fabric lining too.
- Lengths of yarn needed: I saved the shorter yarn scraps for each end of the ball as that’s where the shorter C2C rows will fall. Some of the longer yarn pieces in the middle weighed about 4 or 5 gram balls (at a guess). It’s a good idea to have the yarn leftovers at different lengths. This creates the best hotchpotch look.
- I have started a board on Pinterest especially for Corner to Corner crochet – I love it that much!
- For a more thorough C2C bag pattern I have one for sale in Ravelry. It has photo tutorials on the C2C stitch, how to line the bag and add the magnetic clasp.


 Super Basic Guide on How to Crochet a C2C Bag
Right, the notes are extremely basic but I reckon you’ll be able to glean most of the info you need from them. Give us a shout if they befuddle, baffle or bemuse. But, hmm, they kind of also offer a hideous insight into what my design process looks like. Apologies for the ugly scribbles!!
Let’s type up the most important info needed:
- I used approx 179 grams of different colourful yarn scraps. This is very much stashbusting territory.
- It’s all aran weight acrylic yarn here but you can use other yarn weights too.
- I used a 4mm crochet hook. C2C fabric shouldn’t be too drapey for a crochet bag.
- The bag is made of a C2C rectangle of 21 x 33 blocks.
- The depth of the bag measures 29cm / 11.5inches. The length is 38cm / 15 inches.
- Work one round of UK dc / US sc around the outside of the crochet fabric. To do this, work 2 stitches into the horizonal “bars” of a stitch, and 3 stitches along each block when the stitches are vertical.
- This is then folded in half and joined at the sides.
- To neaten the opening, working a round of UK htr / US hdc. At each join, I worked two stitches together.
- Finally, add lining and handles!
If you crochet a bag of your own, don’t forget to get in touch to tell me all about it! #zeensandroger @zeensandroger over of IG.
Cheers. x
xxx


Thank you for this! I truly love your posts ,projects and podcasts! Teri
Thank you!Thank you very much! 😀
Lovely Rosina, especially like the blue handles with it! Trying to get back into blogging !!
I love the handles too!!
My blogging days are not what they once were… Things have changed for us, we’re busy working! However, I’m always told that blogging is still super important so I’ll keep trying. Just less often! 😀
Yes! I try at least one post a month keep it going. Blogging I think has changed people are all about the instant & stories /you tube
Love it!! It’s totally fabulous.
I’d be up for a c2c CAL! Now… what to make?!
Xx
Hurray, that’s very good to hear!! I need to update this post to add a note about yarn lengths, don’t let me forget!!😂🤣😂