
Whilst I was sewing lots of felt bits recently, I had a thought that it would be nice to share how I do it. It doesn’t happen often. Some kitty cats I made were quite popular so I decided to use my design to show you how to make a brooch. Sewing felt is great, no fraying edges to worry about, it’s versatile and quite sturdy.
I’m making a cat brooch here but you can create any design. Even if your drawing is shocking, something interesting will come out of it. I do not care for the excuse that a person is not creative, it’s complete nonsense. If you want to have a go, just do it. And, since we’ve just begun the summer holidays, I can tell you that this is a fabulous project to do with the kids. Mine love doing this kind of thing. Summer holiday crafts are a must.
Keyrings work well too. Or if you can’t be bothered to source brooch backs and keyrings (get them from Etsy or Ebay), then a few inches of ribbon attached means that it can become a hangy decoration.
This is a good craft project for those who don’t have loads of supplies. A square of felt and a couple of buttons costs less than a quid. You can use buttons, cut from old clothes. You can even use fabric off the same thing if you want. Change the thread for yarn, if that’s all you’ve got. Whatever.
What you’ll need:
Paper and pen/pencil.
Scissors.
Felt (or thickish fabric).
Buttons for eyes.
Embroidery thread (or normal sewing thread doubled up).
Sewing needle and a pin or two.
A small amount of polyfibre fill.
Brooch back, keyring or ribbon.

Draw out the design of your choice: cat, dog, fish, fruit, flower, blah blah. Cut it out. A tip here is to go slightly bigger than you want the finished item to be. The finished thing will work up slightly smaller. Keep shaping to a minimum too, you don’t want to give yourself the headache of awkward corners, or thin poky-out bits. Simple is key.

Pin your template to both layers of felt and cut out. I do it together so that they’re both the same shape.

Cut your thread to about 40cm. If you’re using embroidery thread then you need to separate out two strands, as in the picture above. This might seem daft but a whole thickness of floss is too bulky and looks naff. Alternatively, use sewing thread doubled up. This doesn’t produce as nice a finish but it’s good enough. Tie a knot in the end (obviously). If it’s for the kids, I tie the ends of the thread together because they always yank it off the needle. Always. If that’s the case, I make the thread longer.

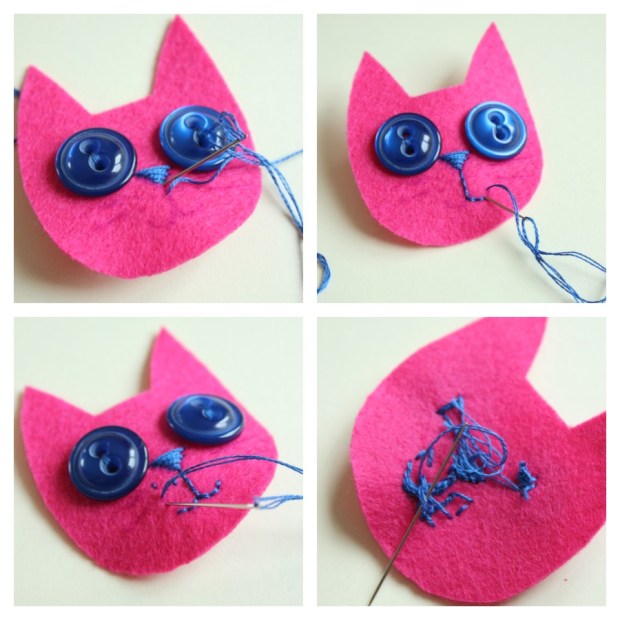
I start with the eyes. You can place them anywhere you like, I like to go wider (leaving room for edge stitching). Poke your needle right through his eyes! Keep knots on the back. I think three rounds per eye is good.

I recently bought a fancy pen for drawing embroidery designs. It cost about £3 from a fabric shop. The ink disappears after a few hours so you can draw your face and not worry about scruffy pen marks. If you’re not that fussed, you can free style it or see if a soft pencil works.
 With the embroidery thread, you’re essentially colouring in. For the nose use a satin stitch, which is just stitches placed really close to one another. For the bit under his nose, I change to a running stitch and follow the line I drew.
 You Tube is your friend when learning stitches.
I ran out of my first lot of thread at this stage. It’s best to leave maybe 8-10cm of thread at the end to give yourself a sufficient amount to tie off and weave in. It doesn’t matter about the tangle you create on the wrong side. Just as long as it is kept to the wrong side.

A little kitty face sewn! If you still have a decent amount of thread left, don’t tie it off yet as you can use it to sew the two sides together. Put this face to one side while you do the next stage.

Sewing on a brooch back is similar to sewing on the eyes. I go in and out of each hole three times at the top and three times each for the bottom holes (bottom holes!!). Make sure the brooch back is the right way up and that it’s placed towards the top middle. Make sure you sew it to the correct side of your felt/fabric too.

Almost there. Just need to sew them together.

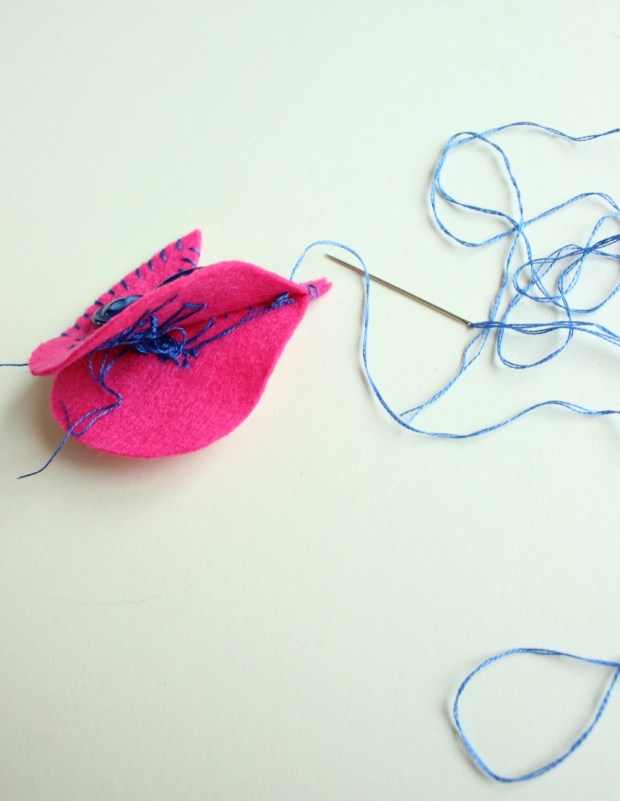
Rethread the needle and it’s time to sew the front to the back. I use a whip stitch. I used to use a blanket stitch but it uses a tonne of thread and a whip stitch looks similar when looking straight on. Meh, you can choose. Just make sure the stitches are neatly done.

(If I was using ribbon, it’d be at this stage, near the top that I’d get it ready to stitch between the two layers).
Again, if thread needs changing, tie off the old stuff and knot in the new all inside your kitty. No one will ever know about the mess!

When there’s only a couple of inches left to sew, kitty needs to acquire some chub. I’ve got a bag of toy stuffing (bought from Amazon) but if desperate go and destroy a cushion (but perhaps you shouldn’t :/). I can’t think of what else would make a good alternative. Anyway, stuff lightly, match up the open pieces and carry on with the stitching.

To finish off, the last stitch to the back needs to be poked upwards and out again, next to another stitch as in the left photo above. Check the front to make sure you didn’t go through to the face too. Go around the stitch you popped out next to and then repeat the process a few more times. I usually aim for five times or just keep going until the thread comes to an end. lose the thread inside newly made felt cat or carefully snip off any that is showing.


It is done. Miaow.
Feel free to and look at my Etsy shop where there are a few for sale! Here are some others that I’ve made before…

By the way, if I spot any of these for sale any where else, I will be cross that you’ve pinched my ideas, so don’t do it. Thanks. Have a good summer!
I have linked up here…
 It has taken an age but I finally found time to record a new crochet tutorial! Hurray! Thank you for being so patient with me. Video tutorials take a lot of time to put together so it’s very easy to drop it lower on the list when something else pops up. Please click on the picture above to go to the tutorial or HERE to my YouTube channel. Don’t forget my Free Patterns page too, that’s HERE


 Cheers! x


