
Corner to Corner Cowl
This c2c crochet cowl pattern featured in a Mindful Makes supplement from Mollie Makes magazine a few years ago. I had forgotten about it entirely. The other day, however, I was chatting with a couple of fellow designer friends and both of them said they intended on revisiting past patterns this year. It’s a really good New Year intention and I fancy jumping on that bandwagon! (Most designers have a backlog of projects they sit on that aren’t quite ready for whatever reason).
With the feeling of the January doldrums rolling in, I have found the perfect pattern to revisit. It’s a gentle introduction to the crochet c2c stitch, which is ideal for a beginner crocheter, or it’s also a really nice pattern if you’re just looking for something easy and calming to work on for a few hours.
Please pop down to the bottom of the post for a quick C2C guide.
What you need to Crochet a Cowl
I used a variegated, colour changing yarn: King Cole Cotswold Chunky (80% acrylic/20% wool, 100g/130m per ball). You will need four balls in Broadway (2381), which should leave some leftovers, I used the leftover to make pom poms. I wish I had a photo of them against the cowl to show how lovely they looked!
A 5.5 mm (US I/9) crochet hook. If you find your fabric is a bit stiff try a 6mm.
Don’t forget a darning needle to sew in any ends and sew the ends of the cowl together.
Additional Info
Finished size: 43 x 40 cm (17 x 16 inches).
Abbreviations (UK terms – see notes below on swapping to US terminology):
beg beginning, ch chain, ch-sp chain space, dc double crochet (US SC), prev previous, rep repeat, ss slip stitch, st(s) stitch(es), tr treble (US DC), yrh yarn round hook.
Tension
Tension is not particularly important for this project. If after a few rows, the fabric works up a bit stiff, try going up a hook size to create looser stitches.
Special Stitches: The Crab stitch
This is used to snaz up the edging a bit. Essentially it’s a double crochet stitch worked in reverse. Crocheting from left to right can feel slightly skewy at first but once you have a consistent rhythm it’s actually quite good fun to do. And it’s quick!
Here’s how to do it: Insert hook in the st to the right, yrh and pull through st, yrh and pull through both loops.
Notes
- Make your cowl by crocheting a long rectangle and sewing ends together.
- Once the main piece is complete, the crab stitch is added to both lengths before pinning out and steam blocking the fabric. (I like blocking as I think it improves most crochet but you can probably get away without doing it here).
- 1 block = 3ch and 3tr.
- C2C is incredibly versatile and keeping the stitch plain showcases its beautiful texture. But there’s nothing stopping you from adding stripes of different colours, or how about adding a fancier border to give it a whole new personality?!
- You can make it as long or as deep as you like by adding more rows before reaching the second corner. In addition, chuck in more rows before starting to decrease to the final corner.
- The pattern is written in UK terms but, I promise, c2c is the easiest of stitch patterns to swap to US terms. Just remember that the main pattern is US double crochet stitches and not trebles. When you work row 1 of the edging, that’s a foundation of SC stitches you’re working, not dc.

C2C Crochet Cowl Pattern
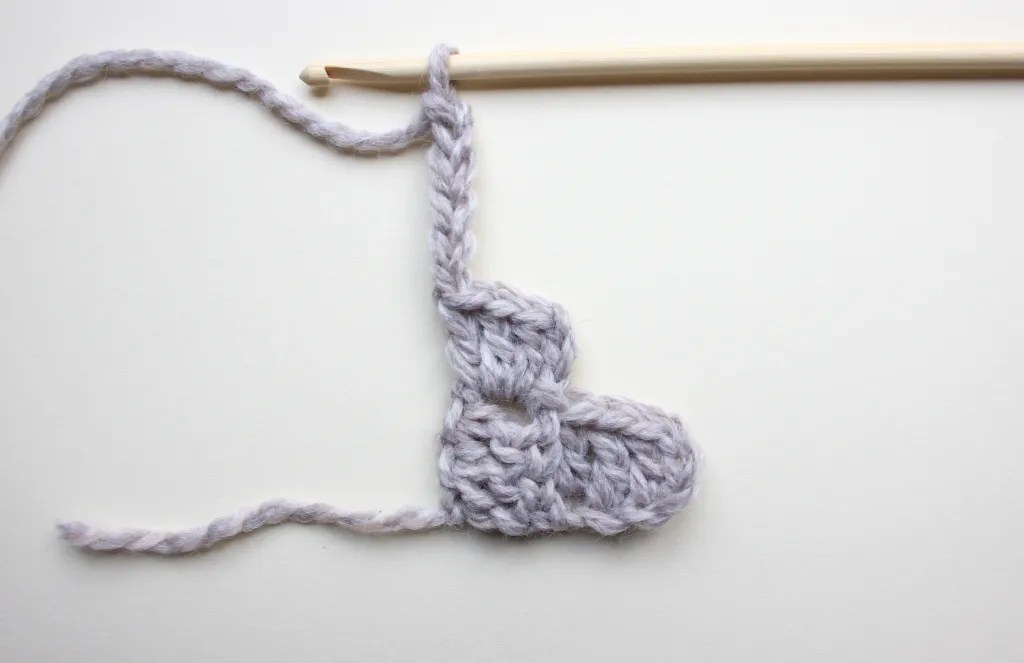
Row 1: Ch6, 1tr in 4th ch from hook, 1tr in next 2 sts, turn. [1 block]
Row 2: Ch6, 1tr in 4th ch from hook, 1tr in next 2 sts, ss into the 3ch-sp of prev row, ch3, 3tr into same 3ch-sp, turn. [2 blocks]
Row 3: Ch6, 1tr into 4th ch from hook, 1tr in next 2 sts, *ss into next 3ch-sp of prev row, ch3, 3tr in same 3ch-sp; rep from * to end, turn. [3 blocks etc]
Row 4 -18: Rep Row 3. [18 blocks at Row 18]
Row 19: Ss along the first 3 sts and into the first 3ch-sp, 3ch, 3tr in 3ch-sp, continue making blocks in each 3ch-sp to the end, turn. [18]
Row 20: Repeat Row 3, ending with 1ss in the last 3ch-sp (ie. do not make the last block), turn. [17 blocks & dec by 1 block each row]
Rep Rows 19 & 20 six more times
Row 33: Ss along the first 3 sts and into the first 3ch-sp, 3ch, 3tr in 3ch-sp, continue making blocks ending with 1ss into the last 3ch-sp, turn. [17 blocks].
Row 34 – 49: Rep Row 33 (decreasing by 1 block per row).
Ss into each of the last 3 sts and into the corner.
Edging
Work along the length of the piece.
Row 1 (a foundation row to work the crab stitch into): Ch1 (does not count as a st), 2dc in horizontal bars of each tr, 1dc in each of the 3 vertical tr, do not turn. [80]
Row 2: Ch1(does not count as a st), crab stitch along to end.
Fasten off and reattach yarn to the other side. Rep Rows 1 & 2. Fasten off.

Blocking and Finishing
For extra drape it’s good to block your work. Pin the crochet onto foam blocking boards, (I used to lay a towel down on the carpet to pin on that but please don’t do this because you might ruin your carpet or poshest towels). Then, using an iron or steamer, carefully steam block ensuring not to melt any acrylic fibres. Hold an iron too close to acrylic and you’ll have ruined all your hard work. Once it’s dry, fold it in half with the right sides facing. Then, using a mattress stitch or whip stitch, sew the short ends together. Turn right side out.
Voila! You now have a finished corner to corner crochet cowl to snuggle into! Wahey!
If you enjoyed this free crochet pattern, please feel free to check out some of my other free patterns HERE.

How to Crochet the C2C Stitch: A Guide
This is just a quick glance at the Corner to Corner stitch. I hope you can see that the C2C stitch is just about building blocks. As the name suggests, start in one corner, make loads of lovely blocks and then decrease to finish at the opposite corner.
Although it might look tricky, it is actually one of the easiest and quickest crochet stitches to work up. The down side though is that it is the very first few stitches that can discombobulate. I know cos I remember learning!
Basically, each block is made up of three chains and 3 UK tr (US dc) stitches. When building blocks row by row, the first block of the row is in an increase and worked into a chain of 6. Each subsequent block is then anchored to the work by slip stitching into a 3ch-sp of the previous row.
Once you have the width you need, you can either decrease from this point to create a square, or carry on working rows without adding a new block every row. Continue the increases but balance them out by ending one block early on the other end of the row (a decrease). This keeps the block count to the same number of blocks per row for as many rows as you need.
Decrease to the other corner by chaining 3 at the beginning rather than 6. Finish with the row with a decrease too, and make 3 slip stitches across and slip st into the neighbouring block’s 3 ch-sp to get to the start of a new row.
Clear as mud?!
If time allows I would love to record a tutorial for this one day. A super simple beginner’s vid. But in the meantime, I do have a video tutorial for a different c2c cowl (the Apres Ski hat & cowl set) I made a few years ago. It has colour work and I assume you know the basics when talking through how to make it.


One thought on “Easy C2C Crochet Cowl. Free Pattern”