As I crocheted the colourful stash-busting scarves, I was already wondering what an Aster scarf might look like if it were super-sized.
The Original Aster Scarf – A petite granny square scarf.
What’s New For Red Aster?!
Red Aster is obviously much longer than the original Aster scarf; it’s wider too. I’ve added an additional row of granny squares to make it two rows rather than a single stripe of squares on the diagonal. They are still encased in granny triangles, which straighten the scarf edges.
Crochet is such a versatile craft that it’s always easy to make tweaks and adjustments. It’s great to see what new ideas come from making little changes.
As Red Aster is a larger crochet scarf, it goes without saying that you will need more yarn. And probably more patience. I found it to be a real labour of love to sew in the squillion ends of all the granny squares and triangles. It fills me with temporary despair but long-term joy.
Continuous Join As You Go Granny Square Scarf
The other new thing for the Red Aster Granny Square scarf pattern is the introduction of a different joining technique: The Continuous Join As You Go method. Not gonna lie, I changed it because, fundamentally, I’m lazy. I did not relish the thought of sewing nearly one hundred squares and triangles together! I am normally capable of squashing down the trauma of crocheting in extra ends, but eh, not this time.
A standard JAYG would mean cutting yarn after each square, and although this is the technique for the original Aster (I needed the scarf edges to be stitchless for the look I was after), I was willing to change the edging to save time and energy. The Continuous Join As You Go method is much quicker as well, so obviously, it’s an excellent choice!
Check out the video tutorial for the Continuous Join As You Go method from when I made a baby blanket a few months ago. The shaping of a square blanket is different from Red Aster’s long trapezoid, but the joining principle is the same.
Granny Square Scarf Fun Facts To Make Your Own
Before you read on, I don’t want to assume you know everything about making granny squares and triangles. But I also don’t have room to share it all in this post. So, with that in mind, let’s do a roundup of useful crochet info you might need to make the Red Aster Granny Square Scarf,
The Red Aster scarf measures: Width: 17 cm / 6.75 inches. Length: 269 cm / 106 inches.
I used 350 grams of DK yarn in total. Although the data is provided in the pattern, it’s not something I worry much about in stash-busting patterns. An unplanned higglepdiggledy approach is often better.
To crochet your own Red Aster Granny Square scarf, you will need lots of lovely DK yarn. This is a super stash-buster crochet pattern, so dig out all of your colourful yarn scraps.
The red edging is Drops Daisy in Red (20); I made sure to have 4 x 50 gram balls and had a little bit left over. It wasn’t enough to add a decorative border, but I don’t actually think I would have added one anyway. I quite like it as it is.
I am usually happy to mix different yarn brands, sometimes different fibres, too. It’s fun to have a happy scrappy crochet project sometimes. However, I have two current favourites when it comes to DK yarn, and they both feature heavily in the scarf: Yarnsmiths Merino and Drops Daisy, which is also a merino yarn. They are both delightfully soft and squishy. And I like the colour palettes in both ranges.
How Much Yarn Do You Need For The Red Aster Granny Square Scarf?
My granny scarf weighs about 350 grams in total. Just under 200 grams (440m) of that is the red edging, so I calculate that you need approx. 150 grams (330 metres) of contrast colours. You probably need a bit more, though, because let’s also account for the ends I chopped off. And, if you think about it, you need enough for complete rounds in many colours. There’s always some finagling with yarn amounts for granny squares, so make allowances for that.
More details are in the downloadable Aster pattern, which is available on Ravelry, and you can buy a copy in my Etsy store. The pattern has the whole collection of scarf designs.
How Many Granny Squares And Triangles?
I briefly mentioned the number of squares you need above, in the Fun Facts section. Just in case you didn’t spot it, I’ll tell you here as well.
You will need to crochet 49 granny squares and 49 granny triangles to make the Red Aster scarf. Each granny square is only two rounds. The third round is incorporated when joining with the red round.
I made a few squares/triangles per night over a series of weeks during spring. I attempted to sew some ends in as I went because I knew I’d not forgive past me if I didn’t at least try. Normally, I leave them all until the end of a project, as, ugh, ends. But, you know, it’s just easier to do it little and often, right?!
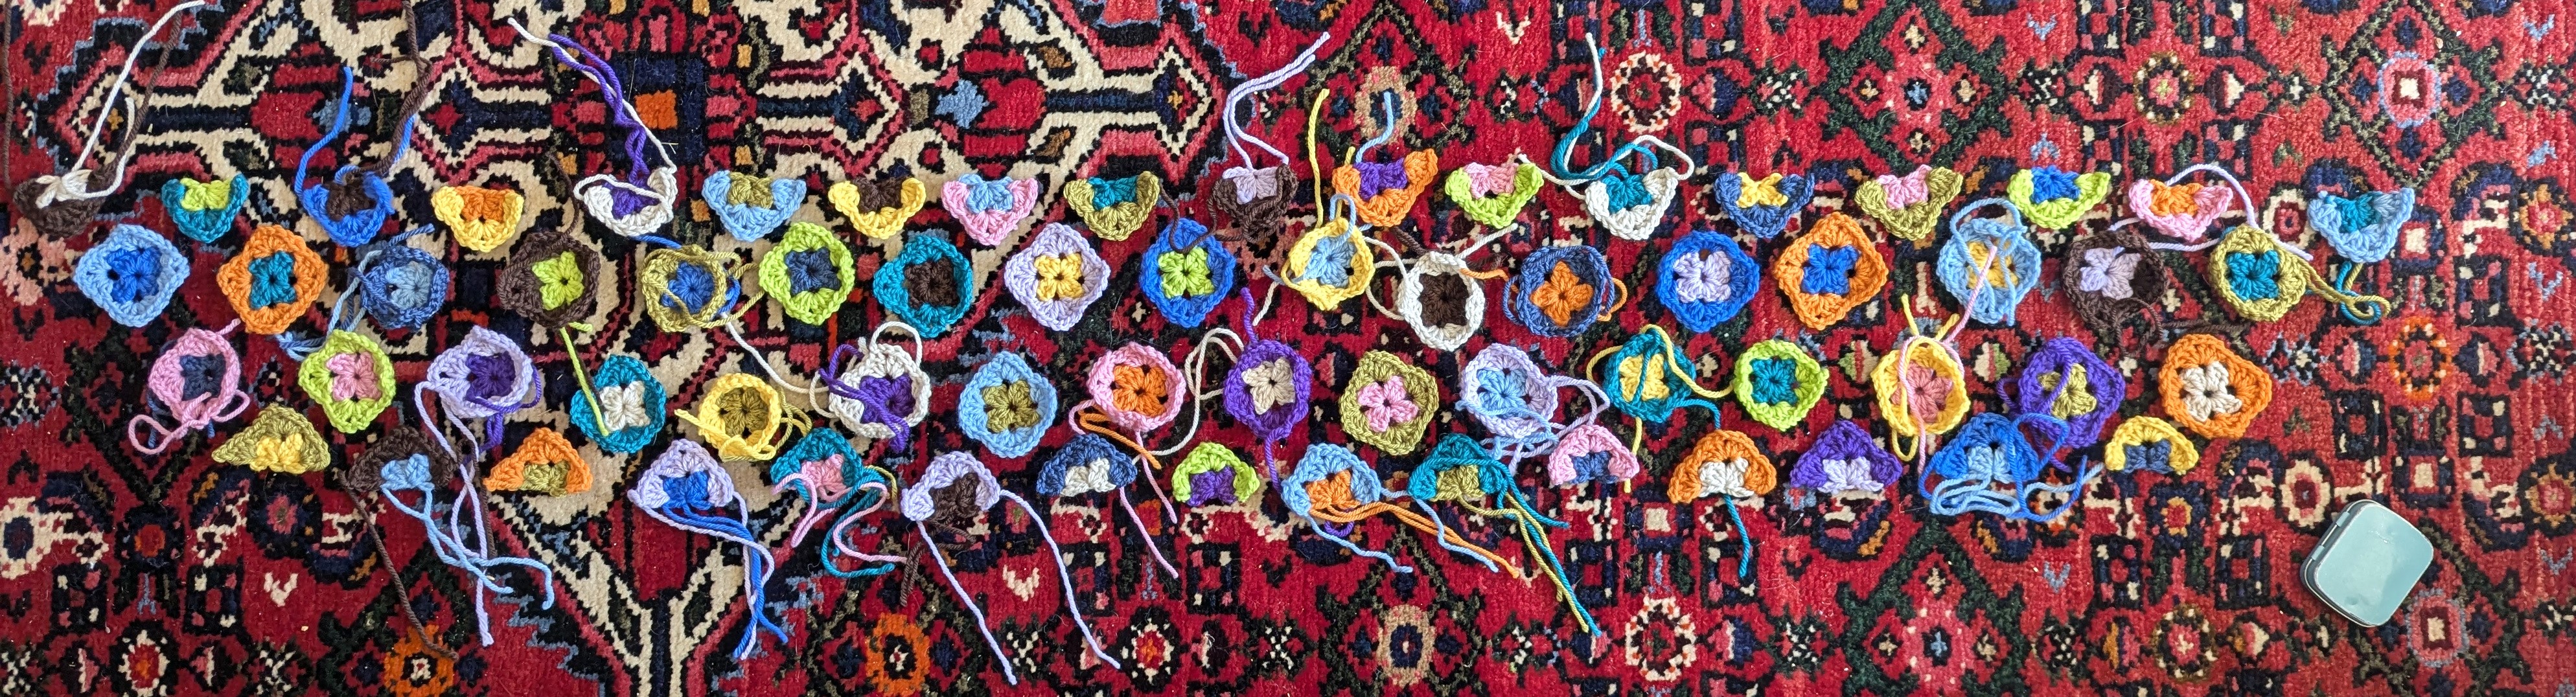
Pictured below is my square layout. Ignore the fact that there are fewer squares than the final product. I got this far and knew it was too short, so I made more motifs until I was satisfied with the length. Don’t look at the ends.
Note that there isn’t any red in the first two rounds of these squares. That’s deliberate.
Make Your Red Aster Granny Scarf
With everything in mind, here is a step-by-step, nutshell order for how to crochet your Red Aster granny square scarf.
Gather your DK yarn stash and a 4mm hook (or hook size of your choice).
Crochet 49 two-round granny squares and 49 triangles.
Sew in ends.
Arrange them in a random order (as above).
Use CJAYG to crochet the granny squares and triangles together.
For best results, block.
Have Fun With Granny Squares
Hurray, your granny square scarf is complete! Hopefully, you should have a good idea of how to make your own Red Aster Granny Square scarf! But don’t forget that you can download the Aster collection, which has more detail, clear written instructions, and maps/charts to help guide you through making the patterns.
However, don’t forget that you can have lots of fun with granny squares (and triangles) by just playing around and seeing what you like. You don’t have to stick to these ideas, as though they’re immovable. Try different yarns, try different-sized squares, different fibres. Crochet is brilliant for trying new ideas. If they don’t work, it isn’t the end of the world, but if the ideas do work, then it’s magic!
If you enjoyed this crochet recipe, check out my otherfree crochet patterns right here on the blog. Cheers. x
If you’re looking for a crochet Sophie Scarf pattern, then you’ve come to the right place! The Sophie Scarf by Petite Knit has been one of the most popular knitting designs over the last few years, so it is no surprise to see designers create crochet scarf patterns with similar shaping and knit-look crochet stitches.
I’ve trawled through lots of patterns inspired by the knitted Sophie Scarf (or shawl, or hood) and collated a collection of crochet versions below. I also had lots of fun putting together a Crochet Sophie Scarf Pinterest Board with even more patterns. I’ve started to add crochet hoods to the board as well, as they look super cosy for autumn and winter.
Petite Knit’s collection of Sophie Accessories
Crochet Sophie Scarf Pattern Criteria
If we’re taking this super seriously, to be eligible for crochet Sophie Scarf pattern status, let’s consider a few different stylistic choices. Top of the list are the following elements I looked for in crochet designs:
scarf size – small,
stitches – simple,
shaping – shallow triangle.
Petite Knit’s modern classic stands out for its simple garter stitch design incorporating a built-in i-cord edging. It is a shallow triangle shawl pattern that’s more like a neckerchief. Is neckerchief the right term? Maybe scarflette? How about shawlette? I’m not sure!
The famous Sophie has two small sizes that tie either once or twice around the neck. Lending to its popular appeal is how fast it can be knitted and how versatile it is. You can make it longer if you desire, use many types of yarn weight or fibre and always get amazing results.
What makers have is a design that can be easily adapted to produce different styles and looks depending on our own personal tastes. I can see why it’s so popular.
What Does This Mean For Crocheting a Petite Scarf?
More than ever, designers are experimenting with modern crochet stitches. For many crocheters, this means uncomplicated stitches and neat lines. No complicated lacework or fussy pattern repeats. In the last couple of years, crocheters seem to want to replicate basic knitting stitches. There’s nothing wrong with this, and actually, for crochet designs that are an homage to the Sophie scarf, it works very well indeed.
Therefore, when looking for ideas for crochet Sophie scarf patterns, we get lots of small pattern repeats and steady shaping of shallow triangles.
I also think, and perhaps you’ll disagree, but for this type of project, finer yarn weights seem to work better in crochet. I plan on experimenting with this a bit in the future, but for now, most of the patterns definitely seem to work best in DK yarn, 4-ply or lighter.
Anyway, without further deliberation, let’s crack on with a top ten list of crochet Sophie Scarf patterns!
10 Crochet Sophie Scarf Patterns
Cerberus, A Crochet Houndstooth Stitch Shawl
Rather cheekily, I’ll start by sharing one of my own designs, the Cerberus scarf and shawl. Cerberus is a houndstooth stitch shawl in three sizes. Choose between a neckerchief (à la Sophie scarf), a shallow shawl, or a deeper triangle.
Cerberus wasn’t totally inspired by the Sophie scarf, but I love the I-Cord edging and was curious to see if I could come up with an easy crochet alternative. I have shared the story of how I came up with the edging in the crochet I-cord edging blog post (which includes a video tutorial!). This double slip stitch edging is much, much easier than other faux crochet I-Cord edgings! I’m going to add it to everything!!
Cerberus uses US single and double crochets in two alternating colours, but you can also use just one colour as well, if you prefer. I am about to start a dark grey Cerberus shawl in aran weight yarn for the colder months. It’ll be chunkier, larger than a classic Sophie, but very, very warm!
Crochet Sophie Scarf By Crochet Bits
Very deliberately inspired by the OG Sophie, this shawl is called the Crochet Sophie Scarf from Crochet Bits.
This knit-look scarf uses slip stitches in the back loops. A whole crochet project that uses only slip stitches is a real labour of love, but it’s also the kind of crochet that looks amazing. I would 100% make the effort with the slip stitch action to create this modern beauty. And it’s a free crochet pattern (with a video tutorial), too!
Use a DK yarn or light worsted yarn for this crochet skinny scarf; you don’t need much of it. 50 grams will make this scarf. Try a 5mm or 5.5mm crochet hook to loosen gauge because slip stitches can be hard to work into.
The Bernie Scarf By TL Yarn Crafts
The Bernie Scarf by Toni Lipsey comes in three sizes and uses rows of US single crochets and chains. This is a perfect beginner-friendly crochet pattern, but also showcases the look of modern crochet. For any tricky bits, there’s a video tutorial to help.
Again, this crochet pattern, inspired by the Sophie Scarf, uses DK yarn, this time with a 4.5mm hook. The first two sizes both use only one skein of yarn each, and I am sure that everyone has a random ball of yarn waiting for the perfect project, right?!
The necktie and cowl can be made with as little as 25 grams of fluffy lace-weight yarn, or 50 grams of 4-ply yarn. The scarf can be made with 50 grams of fluffy baby alpaca in lace-weight yarn, or 100 grams of 4-ply yarn.
With lighter yarn weights, you need a smaller hook size, so this pattern uses a 3.5mm hook with the two-row pattern repeat. However, there is nothing to stop you from working this crochet shawl in a thicker yarn. You might just need a bit more of it and to up your hook size.
The Chameleon Goes With Everything Scarf by Mariana Muller
The Chameleon GWE by Mariana Muller, as the name suggests, goes with everything! It is a really pretty design that uses fingering-weight yarn, although it’s super versatile as well.
This crochet scarf pattern shows how the introduction of simple stitch variations creates a pretty addition to a plain Sophie Scarf. The modern style is still maintained, which is perfect for going with all kinds of outfits, yet there are very cute popcorns to elevate and add interest without detracting from the main point of this type of design.
Check out Mariana’s other crochet patterns on Ravelry as well, because she has some really beautiful scarf and shawl designs that I’m sure you’ll love.
Frivolity By Dora Does
Make the most of your yarn stash with the Frivolity Scarf by Dora Does. It comes in mini and maxi sizes so you can crochet a Sophie scarf-like shape or make a bigger, cosier shawl. Single crochet stitches are worked into the front loop this time, which creates smooth, regular ridgelines.
You don’t have to use lace-weight floof in your crochet, but Dora does. Holding a 4-ply yarn with fluffy mohair or brushed alpaca works so well in crochet; I love it! If you love the look of mohair but worry about getting in a tangle due to flyaway fibres, the easy stitch pattern of the Frivolity scarf means it’s a great design to try first.
Mdays Scarf by Crochet Objet
I’m breaking my own rules here. Nevermind. If you’re after something slightly different to a shallow triangle shawl but still want to join in the small crochet neckerchief trend, the Mdays Scarf is a gorgeous project.
Instead of the shallow triangular point that’s achieved with uniform increases and decreases, let’s try some gentle crescent shaping. The Mdays Scarf also features a rippled edging that’s knitted. You could choose to do this in crochet too, if you’re confident enough to experiment. But combining knitting and crochet in the same pattern is quite popular at the moment.
The options to play with colourful edgings are vast. And because the pattern is quick to work up, you could make loads and loads to see all the colours come to light. Very exciting!
My Scarf Crochet Pattern By Lillabjorn
Great minds think alike; we have another pattern that combines single crochet stitches with chains. It’s those tiny stitches that make the neatest scarflettes, I think. My Crochet Scarf by Lillabjorn is a free pattern and one that looks very easy to make.
With most of these designs, you can easily adjust the size to make it a larger scale if that’s more your style. Why not add stripes of colour to use up yarn scraps as well? You need fewer than 50 grams of 4-ply or fingering-weight yarn to make the small crochet scarf. Not bad at all!
Winter Rose Scarf By Lucia Luciana
Using crochet brioche and short rows, the Winter Rose scarf is a delicate and drapey design that’s super elegant. If I were going to crochet this scarf, I’d be tempted by a plump DK merino yarn for excellent stitch definition, but I also know it’ll look great if you add mohair into the mix as well.
The pretty swirls created by short rows add a touch of sophistication as we move on from plain stitches into something more decorative. It’s still easily achievable, though. I am sorely tempted to make this fancy little scarf…
Florence Bandana By Stitchberry
The Florence Bandana by Stitchberry uses the classic crochet linen stitch (AKA moss stitch and/or granite stitch). US single crochet stitches are worked into chains to create a flat, smooth fabric that’s universally popular.
This crochet Sophie scarf pattern also has a very cute border that I think I need to try!
Bonus Crochet Pattern No. 11! A Granny Square Scarf
Let’s have a bonus pattern too! I’m not even sorry – here’s my Aster Granny Square scarf! It’s a colourful little scarf with big ideas, and it’s a free crochet pattern here on the blog! OK, so it isn’t quite eligible Sophie Scarf material, but the Sophie is where all these bijou patterns sprang from. It absolutely counts!
Despite its tenuousness, the Aster Granny is a lovely little pattern to try. Make one if you’re up for a fun, stash-busting crochet project.
11 Sophie Scarf Crochet Patterns!
That was fun! I’ve really enjoyed finding all of these crochet patterns.
Which Sophie-type design are you drawn to the most? Have you made a little crochet scarf already? Do you think the trend will continue? Can you see different styles of shawl patterns becoming popular? Oh, there are so many questions!!
If you have made it this far, thank you very much for reading. See you again soon. Cheers. x
Oh, and PS. Don’t forget that the Pinterest board has many more quick crochet ideas for Sophie Scarf alternatives.
Finally, after several weeks and months, I am pleased to share my Sun Dogs crochet pouch pattern!! These cute cotton drawstring bags come in three different sizes and use really simple crochet stitches. Yet, despite their simplicity – the Sun Dogs pouches use the houndstooth stitch – they look stunning! (I am allowed to say this even if they’re my own design, right?!)
You can buy a copy of the pattern from my Etsy shop or, if you’d prefer, you can find Sun Dogs on Ravelry. The pattern comes in US and UK terminology, and has charts and lots of photos to help you with the stitch construction. However, if you want a little try before you buy, find a snippet of the crochet pattern below!
And get 25% off your pattern with the code: SUNDOGS26 (valid until 1st August 26). However, today, I am sharing the small-sized crochet pouch right here on the blog. For free!!
Try The Little Sun Dogs Pouch Pattern
While I think you’ll really enjoy the full PDF crochet pattern, with three different sizes and all the bells and whistles of additional information, I am happy to share the small crochet pouch pattern below.
So, you will need a 3.5mm crochet hook and some DK cotton yarn. For this project, I chose to use Yarnsmiths Cotton DK. I bought a bucketful of various colours a few months ago and have really enjoyed using it in different crochet patterns. In my experience, it is ideal for crochet as it creates a lovely stitch definition and has a decent range of shades to choose from.
Actually, Sun Dogs is a great crochet pattern for using up yarn leftovers, too. And no one says you have to use cotton DK. You can use lots of different yarn fibres and weights for this quick crochet pattern; it’s so versatile!
However, I think natural fibres will work best for structure and durability. If you don’t like cotton, how about bamboo or linen? And if DK is too thick for your tastes, try 4-ply cotton instead!
Did You Know?
Sun dogs, or parhelia, are bright spots of light that sometimes appear on either side of the sun. They are seen as a sign of good luck. I thought this was lovely, and it’s the perfect name for a crochet pattern that uses the houndstooth stitch!
And another fun fact… this little pouch was first designed in November last year. I made one off the hoof for my little niece’s birthday. I made the medium and thought it needed some companions. Of course, you could make it in any size you like, really.
The following instructions are written in US crochet terms. Note that CC means contrast colour.
Pattern Begins
With the main colour, ch4 and join with a sl st to form a ring, or work a magic circle. Rnd 1 (Right Side): Ch3 (counts as a st here & throughout), 11dc into ring, join with sl st to first st, do not turn. – 12 sts. 2: Ch3, 1dc in same st, *2dc in next st; rep from * around, join with sl st, do not turn. – 24 sts. 3: Ch3, 1dc in same st, 1dc, *2dc in next st, 1dc; rep from * around, join with sl st, turn. – 36 sts. 4 (Wrong Side): Ch3, 1sc in next st, *1dc, 1sc; rep from * around, join with sl st, turn. Change to CC. 5 (R/S): Ch1 (does not count as a stitch), 1sc in first st, 1dc, *1sc, 1dc; rep from * around, join with sl st, turn. Change to main colour.
Rnds 6 – 14: Rep Rows 4 & 5, ending on R4. 15: With main colour, as Rnd 5, do not turn. 16: Ch1, *3hdc, ch1, miss 1st; rep from * around, join with sl st, do not turn. – 9 sps. 17: 1sl st into next st (middle st of first 3hdc), 5dc in ch-sp, *1sl st in centre st of next 3 sts, 5dc in ch-sp; rep from * around, join with sl st to first sl st. – 9 scallops.
Fasten off and cut yarn. Sew in ends.
I made a crochet tomato! Or is it a strawberry?! To find out, I put it to a vote on Instagram, and a huge majority of folks chose strawberry. That means, at some point, I’m going to have to sew on a bajillion little beads… FYI, it’s made using the small Sun Dogs crochet pouch.
I really hope you like the pattern. You will definitely whip one up in no time at all. For more crochet inspiration, check out my free crochet patterns page.
Let’s just start with the sad bit and get it out of the way. My Mum died. I flip between knowing, accepting, and understanding wholly that it was her time to go, and complete and utter surprise that she actually deigned to leave after being so stubborn, ordinarily refusing to let illness stop her.
First and foremost, I saw her as a scientist (she worked in labs since the age of sixteen) and an avid learner of many things. But, perhaps due to the generation she was from, or perhaps just because she wanted to, she also explored arts and crafts and had many strings to her bow.
She made her own clothes until her fingers couldn’t. She made me clothes when I was little, too. And I still have a couple of items that she knitted and crocheted back in the seventies and eighties (I can’t write these as actual numbers, as she would say it wasn’t grammatically accurate).
Anyway, I’ve been going through some of her photographs to sort them out, and I’ve found a couple where she’s carrying a really cool patchwork bag. I don’t know if she made it herself. Maybe? A friend might have made it, or perhaps my Nanna (at one time, her mother-in-law).
Unsurprisingly, I saw the bag and thought, I bet that would look amazing in crochet! And that’s all there was to it. I immediately made a start on Mum’s Granny Square Bag.
Fundamentals of Making Mum’s Granny Square Bag
In the rest of this blog post, I’m going to break down all the details so that you have a recipe for how to crochet a granny square bag of your own.
You can also watch the accompanying video of how I made it, which includes a casual demonstration of how I worked the final squares to join them into a bag shape. Plus, I have an argument with a sewing machine.
I know it’s a lot, but I recommend reading through everything.
This Granny Square Bag blog post consists of the following:
These are all clickable links that will take you to the relevant section of the blog post!
Using Leftover Yarn To Crochet A Granny Square Bag
Mum’s granny square bag (or, if you feel that’s weird, you can call it Granny Margaret’s Bag) is made from yarn scraps of cotton DK yarn. I didn’t allow myself to buy any new yarn for this project as I have yarn in my stash that’s been sitting there for far too long. A granny square project like this is ideal for using up leftover yarn.
As luck would have it, I had enough yarn in lots of bright colours. Some I definitely ran out of and had to eke it out very carefully, but it is definitely the ultimate kind of Stash Busting. It felt so good to use it. It’s not all Paintbox DK cotton, but most of it probably is.
My advice for a crochet project like this is to make conscious choices about saving longer scraps of yarn for later granny square rounds. I used my tiniest yarn leftovers to work the first rounds. The amount I had of each colour definitely dictated colour choices; beyond that, I didn’t think about it too much.
Granny Bag Measurements and Useful Info
OK, we’re beginning to lay out a recipe here. I’ll start with measurements of the different bag elements.
One four-round granny square using my own pattern measures 12 cm across the diagonal. The finished bag measures: 36 cm deep x 49 cm across (not including the handles or tabs).
You will need 42 granny squares and 12 granny triangles. I have video tutorials on how to crochet both – see links below.
Things You Need To Crochet A Granny Square Bag
You need more than 352 grams of cotton DK yarn! This is what my bag weighed before its lining and handles. And you’d have to be very blessed to have the exact amounts in all the colours, so make sure you have more than that in total. You’ll need surplus to ensure you can do some jiggery pokery with colour combinations, etc. See below for a suggested palette.
You will also need a 3.5mm crochet hook (we don’t want loose and floppy grannies, do we?!).
Bag handles are from Amazon, Etsy, or a craft shop. Type “long bag handles” into Google, and these are bound to come up. They’re fairly common.
Fabric for lining. Nothing fancy is needed; mine is probably cheap polycotton.
Optional but advisable – a (working) sewing machine.
Lots of bulb stitch markers, needle and thread.
Yarn Colours For Mum’s Granny Square Bag
I’ve mentioned yarn scraps and using yarn leftovers, and look, this is not a project where I can be precise with each colour. I can give you a rough idea of the colours, but they’re not all exact, as I actually used some other brands. However, assuming you want all the same, let’s go with Paintbox DK cotton, since that’s the majority. The shades are as follows (I’ve matched them as closely as possible where it’s a different brand).
If you had one ball in each colour, you would absolutely have enough to make Mum’s Granny Square Bag.
List of Colours Used:
Spearmint
Bubblegum Pink
Vanilla Cream
Slate Grey
Lime Green
Washed Teal
Marine Blue
Lapis Blue
Pale Lilac
Pansy Purple
Raspberry
Rose Red
Daffodil Yellow
Blood Orange
Rosy Pink
Coffee Bean
Crochet Hints, Tips and Tutorials
Here, I’ve collated other crochet resources that will help you.
This is so useful!! You’ll need this chart for the granny square layout.
I am embarrassed to admit that I got the shaping wrong twice before this successful attempt. My poor little noggin isn’t the sharpest at the moment, and I messed up. First, because I kept thinking I was going to be joining totally different square sides. After much confusion, I cut out a chart and folded it like a little origami piece. That way, I could actually see where each square needed to be joined. Oh dear!
Then, I completed a whole piece of fabric, had it bag-shaped and ready to line. It was enormous! I’d even sewn in all my ends. There were hours of unpicking to get rid of the extra granny squares I didn’t need. Arghh. Never mind, it’s a lesson in patience.
Right, let’s look at the (correct) chart below. The squares marked with asterisks indicate which to leave until all the others have been joined. You need to leave those to the end because they are the ones that turn a flat piece of fabric magically into a bag pocket – by the power of Join As You Go. Speaking of which…
Join As You Go Granny Squares
For a project like this, Join As You Go, or JAYG, is the best joining method for granny squares in my humble opinion. Well, you can sew them if you want to, but this is a heck of a lot quicker!
Work most of the squares in a flat piece of fabric. It’s only the last four squares that are joined on every side to turn the flat fabric into a 3-dimensional bag. Follow the chart, but also bear in mind that you might wish for an even distribution of colours.
Below is a photo of how I choose to distribute colours evenly. I absolutely played about a bit, switched around colours whenever I fancied. You do not have to be rigid in this kind of crochet project, and you can do what you like.
The photo might be one of the first attempts, so if you’re trying to copy, note that it could be wrong. However, it does a good job of showing, visually, what I mean by the distribution of colours.
I like the idea of having half a plan so that there’s freedom to make small adjustments should I decide that, actually, it’d be nice to make the final round a shade of green for a particular square rather than turquoise… Or, one section has the lion’s share of red; let’s spread it out a bit. Perhaps, it’s a bit like yarn ball chess! Sort of.
JAYG Granny Triangles
These form the bag top and side openings. I have a video tutorial for the granny triangle pattern. Here’s the link for how to crochet granny triangles.
I tweaked the hypotenuse of the triangle for the final round to remove a cluster (you’ll see in the video). The idea behind this was to get rid of any bulk at the tops of the bag. You don’t have to, though, and I’m not convinced my tweakings were worth it.
You use the same JAYG method for triangles as you do for squares.
Simple Tabs For The Granny Bag Opening
Once you’ve completed the joining of the granny squares, the bag needs a couple of tabs at the bag openings. These are to slide through the gaps in the handles, thus anchoring them in place once they’ve been stitched down.
The tabs consist of two rows of US double (UK treble) stitches followed by a final row of SC (UK dc) stitches to both opening ends. These tabs prevent the handles from gobbling up the granny triangles. I want to see my granny triangles in all their glory!
There is nothing fancy about these tabs; they’re for practical purposes only. Join in your preferred way and, for Row 1, crochet along the series of triangles. I didn’t take a photo, but you can see it more clearly in the Granny Square Bag video.
Sewing A Crochet Bag Lining
Once you’ve made Mum’s Granny Square Bag, make a simple lining. It really will add structural integrity and make your bag last longer. Everything I’ve done to sew this bag lining has been eyeballed.
Lay the crochet bag on top of a folded piece of complementary fabric that’s slightly larger than the crochet – something like a medium-weight cotton or polycotton is fine.
Mark where you’ll need to sew the side seam, where to stop and press the side openings, and where you’ll need to top stitch the opening hems. Once stitched and pressed, I placed the pocketty lining into the bag and pinned it in place so I could hand-stitch it securely.
If you’ve seen the video, you’ll know that I did not have a good time with the sewing machine. It’s almost entirely user error! Yet, despite my tantrums, I think you’ll get the gist.
Attaching Bag Handles to Crochet Fabric
Attaching bag handles doesn’t have to be perfectly done. I wriggle the top tabs through the handles and then pin them in place using lots of bulb stitch markers. When sewing the tabs down, I used doubled up thread. I think this makes it much more sturdy.
Another Granny’s Patchwork Bag. Future Plans!
So, what I’ve shared above isn’t the final iteration of Mum’s granny square bag. It’s not quite right yet. But don’t get me wrong, it’s a stunner, but I can make one that’s even better.
Mine is a different ratio than Mum’s patchwork bag, so I want to change that. Mine is a lot deeper, and I know what I’ll do to change it for next time. Basically, there are two main things to change: I can make the squares a round smaller, and increase the width of the fabric by adding another row of granny squares. That would adjust the proportions. Although don’t take my word for it just yet, I haven’t done my sums!
Then, I might use 4-ply yarn and keep the same number of rounds as this colourful version, but still add another row of squares. 4-ply cotton will make a smaller, lighter bag and remove any hint of bulk. Not that I think DK yarn is bulky, but eh, it is just a teensy bit. It makes it a heavier bag than I’d like, so I will need to go yarn shopping for 4-ply cotton – such a shame!
And when I do that, I will try to replicate the colour palette on Mum’s OG bag: lots of dusky hues and perhaps colour block squares rather than stash busting. What do you think?
Mum’s Granny Square Bag
And that’s it. You should find everything you need here to crochet your own bag, but if I have missed anything or you have a burning question, please leave a comment, and I’ll get back to you.
We’re having a heat wave in the UK, so we need to protect ourselves from the rays of the blazing sun. A really super way of doing that is to make some crochet hats for the summer!
A summer hat made from light cotton yarn or raffia is a great crochet project for quick satisfaction, but it is also practical. More than ever, we are becoming more conscious of looking after our skin, so these three crochet hats for the summer are perfect to protect your head and shield your eyes.
Each of the crochet bucket hat patterns I am sharing with you today are totally free and right here on the blog! Find them and more on my Free Crochet Patterns page. Or, for a closer look at the crochet hats for summer, read on…
Cotton Bucket Hat Pattern
Let’s start with the most straightforward crochet summer hat. It is a bucket hat made from DK cotton in easy US dc stitches. You will be able to whip up one of these bucket hats in no time.
What I haven’t done yet is to make one in all one colour, and I would love to! I’m also tempted to add a scallop border, which would look really pretty. Included in the pattern is a crab stitch border, but you could easily adapt this to add something different.
Up until now, I have used this crochet hat pattern to bust my stash. You can make it so that each round is a different colour, like I did in my first cheerful hat, or every two rows, as above. Or, make it more colour block. You can do whatever you like!
A couple of winters ago, I designed a cosy granny stripe hat, really warm and woolly with a snug ribbed brim. This summery granny stripe hat is the version for warmer weather.
This time, I chose to use an aran-weight cotton yarn but downsized on the crochet hook to make a stiff fabric. Sometimes, I am not keep on floppy hats as they have a tendency to get in the way of your face.
Find the free granny stripe bucket hat pattern here. This pattern includes some useful tips and tricks to learn and improve your crochet techniques.
Crochet a Raffia Bucket Hat
This raffia bucket hat is my very first summer crochet hat design. I made it with Wool and the Gang’s Ra Ra Raffia, which is a very nice raffia to work with. I’ve tried others before, and my hands have been punished. I must see if I can find alternative yarn substitutes, as it’s quite pricey stuff. Anyway, I digress…
This final pattern of the three crochet hats for summer uses hdc as the main stitch. In raffia, it looks nice and tidy and is still speedy to work up.
As the pattern is a bit older than the others, it is written in UK terms, so it’s a good job I have a tutorial, so you can get a better understanding of the terms. I explain in the blog post, too. There are also lots of pretty pictures to look at. They are so summery and quintessentially English looking!
Three Crochet Hats for Summer
There is a connection between these hats. I often find that ideas create new avenues to explore. Therefore, the making of the raffia hat led me to wonder if I should try dc stitches rather than hdc. What would happen to the shaping? The number of rows? How can I change the brim to flare out more? Thus, the Easy Cotton Bucket Hat was born.
So a new bucket hat is on the scene. But how can I change that one, too? What would it look like in granny stripes? How can I make the fabric more useful for a summer hat? Voila, it’s the granny stripe hat!
What’s next in the crochet hat evolution? Well! Gosh, ideas beget ideas, don’t they? I think I could come up with a few more suggestions. How about you? What would you do to add your own additional tweaks to your summer crochet hat? Let me know!
Granny Stitch Shawlette: A Quick And Easy Crochet Project
This granny stitch shawlette pattern is a really quick crochet project that you can work up in just a few hours. It is named Harpier, which is a nod to its cousin, the Wayward Sisters shawl. It is very similar but with a few small differences. These little tweaks create a completely new look.
Both names are taken from Shakespeare, not that I’m a major fan or anything, but I did study Macbeth at school and always liked the witchy element. The rest of the story, well, I won’t tell it here. This is about the granny crochet!
Yarn To Crochet a Shawlette Pattern
For the main section of my granny shawlettes, I used 150 grams of DK merino yarn. But you can use any yarn you like for a simple crochet idea like this. If you want something a bit daintier, why not try a 4ply or sport-weight yarn?
I made a 4ply version using Drops Alpaca – I use Drops a lot at the moment, this is not sponsored, it’s just really cheap for what you get, so I bought a lot this year! When I made the navy version in the picture below, I worked as many rows as I could with one ball. I left just enough to work a foundation of US sc stitches all the way around.
I have no idea where this little crochet neckerchief has gone. Where is it?! I want it so I can count the number of rows I worked. Arghhhh, how can it be missing?!!
Granny Shawlette Pattern
Things You Need To Crochet a Granny Shawlette
150g DK yarn – I used 3 balls of Drops Daisy for the main colour -100% Wool (110m/120yd/50g). Marzipan is the neutral shade, and I think Brown was the other.
1x 50g ball of contrasting colour for the edging. You won’t use it all.
If using 4ply, you can make a slightly smaller version with one 50 gram ball of the main colour, plus another shade for the border.
4mm crochet hook. Or, if you are using a different weight of yarn, match your hook size to the yarn.
The granny shawlette pattern is written in US terms.
You can buy a PDF version of Harpier, this granny shawlette, here on Ravelry. And if you don’t use Rav, it is also in my Etsy store. It also comes with charts for the shawl, plus the crochet edgings.
Granny Shawlette Pattern
Chain 4 and join with a slip stitch. (I don’t use a magic circle for this, as I will work into the chained ring when it comes to the border). Row 1: Ch4 (counts as 1dc and 1ch here & throughout), 3dc, 1ch, 1dc, turn. [1 cluster of 3 dc + 1 st at either side] Row 2: Ch4, 3dc in first ch-sp, 1ch, (3dc, 1ch, 1dc) in last ch-sp, turn. [2 clusters + 1 st at either side] Row 3: Ch4, 3dc in first ch-sp, 1ch, 3dc in next ch-sp, 1ch, (3dc, 1ch, 1dc) in last ch-sp, turn. [3 clusters + 1 st at either side] Row 4: Ch4, 3dc in first ch-sp, 1ch, *3dc in next ch-sp, 1ch; rep from * to last ch-sp, (3dc, 1ch, 1dc) in last ch-sp, turn. [4 clusters + 1 st at either side, increasing by 1 cluster each row] Rows 5 – 40: Rep Row 4.
Which Crochet Edging Will You Choose?
There are two options here for adding crochet edgings to your granny stitch shawlette. But there is nothing to say you have to use either of these edgings. You could add crab stitch, a camel stitch would look great, or perhaps some dainty picots. Keeping it simple works best in a pattern like this.
Below, I have provided two crochet edgings to add to your little granny shawls. First up, if you fancy a fuss free crochet I-Cord, I’ve got you covered. And if that’s not your bag, let’s go full-on classic crochet with a scallop border.
For both edgings, I chose to use contrasting yarn colours. You can use the same colour as the main part of the granny shawl if you prefer.
Crochet I-Cord Edging
For a modern twist in crochet, try this easy crochet I-cord edging. Essentially, it is a double slip stitch, and it is like a cheat’s crochet i-cord. Compared to other crochet methods for creating an I-Cord, it is super quick and easy. Below is the link to a video tutorial as well.
Here is how to work a double slip stitch (dsl st): *Insert hook in first st, yo & pull through (2 loops on hook), insert hook into next st, yo, pull through all loops; rep from * starting in st just used.
Rnd 1: With main colour, join yarn to any st, work 3sc in each end of granny stripe rows, 1sc in each st along top, and 3sc in beg circle made at the bottom point of the triangle, join with sl st to first st, turn. – 486 sts approx. Don’t worry if it’s a stitch or two different – To be honest, I didn’t even bother to count mine as life is too short. Rnds 2 – 5: With a contrast colour, dsl st around in a continuous round.
A Simple Scallop Edging
If you’re not ready to crochet I-cord edging, or it’s not as pretty for what you have in mind, let’s go for a crochet scallop edging instead.
I haven’t bothered with a round of foundation stitches; I just work the scallops directly between the granny clusters. Note that “clus” means clusters, representing the three stitches of a classic granny.
Rnd 1: Join a contrast colour to end of Row 39, 1sc, *5dc in next row end, 1sc in next; rep from * down 1st side to point, 7dc in point, 1sc in next row end up 2nd side of shawl, rep from * to last row of 2nd side, 7dc in end of Row 40, miss 3 sts, **1sc in sp between clus, 5dc in next sp between clus; rep from ** to end, 7dc in end of Row 40, join to first sc with sl st. Fasten off and sew in ends.
Blocking a Crochet Shawl
This is the sort of crochet project that comes to life after blocking. It looks OK before, too, but honestly, blocking takes it to another level. In fact, this is a dead simple crochet project to try blocking for the first time.
Here’s blocking in a nutshell: Blocking means to wash or steam your yarny items and then (gently or aggressively, depending on the situation) pin out to stretch the item as it dries. It will then be fixed in its new state. It adds drape and softness, and can make the yarn in your crochet project bloom into life.
I recently bought a knitting dolly. I remembered having one when I was a little girl and suddenly wanted to try it again. They are less than a tenner, so I added one to my basket at a recent yarn buying session. A few inches of “knitting” and you have an I-Cord to tie your granny shawlette! I think it’s cute.
The “knitted” cord produced by the doll matches the i-cord edging of the granny shawlettes. They are ideal for tying a crochet kerchief around the neck, and it looks very cute.
This colourful yarn of the edging is a beautiful hand-dyed yarn by Hook & Cwtch.
If you have enjoyed making a granny stitch shawlette of your own, please let me know. You can add your cool new crochet project to Ravelry, I’ll definitely spy it there. And if you want to try another of my free crochet patterns, you can!
The Woolly Gathering And Yarn Shopping in Edinburgh!
A couple of weeks ago, I was in Scotland. I combined two trips: one, a visit to see my sister and her new wee boy in the Highlands, and two, a weekend yarn shopping in Edinburgh!
I bought some new woolly treats in Edinburgh, and I managed to sniff out some local souvenir yarn further up north, too. So, I thought it’d be fun to share what I got up to with you.
Knockando Woollen Mill And A Stay Near Findhorn
Before I share the adventures that were had in the yarn shops in Edinburgh, I thought I’d share a quick couple of things (what I got up to) when I stayed nearby Findhorn, which is about 25 miles away from Inverness. This includes yarn, so it’s totally relevant!
Side note: It’s a bit chillier in Scotland, so I made sure to borrow a granny square blanket to keep us warm on the cold nights. It’s one of mine, a birthday present for my sister from about 14 or 15 years ago. It’s old, and my stitching techniques have much improved since then.
Findhorn to Culbin
I won’t go into much detail, but my favourite thing we did was a quick water taxi from Findhorn to the other side of the estuary, to Culbin. We also just hung out as a family; it was really nice to do.
As I live in Devon, and my sister lives in Scotland, it doesn’t happen very often, and I love to see my boys get along so beautifully with their cousins (I have some lovely pictures of the boys reading stories to the little ones).
The weather was on our side, so we thoroughly enjoyed the quick pootle across the water, where we got to spend some time with the seals. We could hear their chatter very clearly, but made the sensible decision not to get too close.
A trip to Findhorn and Culbin
Knockando Woollen Mill
When staying with family, it’s always good to have plans for activities you might want to get up to. For me, it usually involves wool or yarn of some sort. So, since my sister knows this and is also a crocheter herself, she suggested Knockando Woollen Mill, as it isn’t too far from where she lives.
You can buy yarn from Knockando Woollen Mill, so I did! It was the first yarn purchase of the trip, and it’s good souvenir yarn. Pricey, but I will crochet something good out of it. I will pair it with a skein of yarn I bought from Marcassie Farm Shop. It’s a small shop that sells small quantities of wool skeins and knitted creatures.
Knockando Woollen Mill – Machines and Equipment
I had never heard of a Teasel Gig before. Thousands of teasels in a machine rotate really, really fast to scuff up the surface of woven wool to create a fluffy texture. I’d love to see it in action!
There was also a 60ft tenser outside. It’s akin to blocking crochet and knit fabrics, I suppose. Newly woven wool fabrics are stretched onto the tenser and left to dry. On a sunny day, this wouldn’t take long.
There were lots of other pieces of machinery, all needed to go through the steps of turning sheep fleece into yarn and fabrics. We watched a video and toured the mill site to see all the old contraptions.
The whole family enjoyed, and if you’re in this neck of the woods, it’s a half-day activity. The grown-ups learn more about wool production, and the little ones can run around outside or play Poo sticks on the bridge.
A Teasel GigA tenser to keep fabric stretched and taut as it dries.
Anyway, as is so often the case, time was up, and we were getting ready to leave. We waved goodbye to the family, and I waved goodbye to my boys to hop on the three and and half hour train journey to Edinburgh. As train journeys go, it’s an absolute corker. Stunning views from start to finish. I took crochet to do, but honestly, I mostly just stared out the window.
Edinburgh Yarn Shops
Edinburgh is definitely a yarn lover’s paradise. Not only are there four dedicated yarn stores, but yarn is also sold in many other shops around the city. You can’t turn for seeing yarn displayed in shop windows. It’s great!
Essentially, we had three days in Edinburgh and aimed for a balance of taking it easy and breathing in as many yarn fumes as possible.
The Wayward Sisters: Crochet Designers At It Again
This is the fourth year that we’ve joined crochet forces to hang out with hooks and yarn. Whether it’s just to spend time holed up in a country getaway or visiting yarn shows, we have found the time to get together and work our creative magic.
If you love yarn and you’re in Edinburgh, make it a priority to visit Be Inspired Fibres. Situated on Marchmont Road, I almost didn’t spot it. It’s small but packed with yarns from all around the world. It was a pure treasure trove; a box of delights!
I absolutely love this haphazard approach to shopping. If you’re hardcore into yarn, this place won’t intimidate you; it will fuel your passion. You can feel the enthusiasm and dedication for knitting and crochet. Let’s just say that it outweighs the seemingly needless requirement of organisation. It is ruddy brilliant.
For this yarn shop, I would recommend knowing what you’re looking for – not necessarily a specific yarn but just an idea of the kind of project you’re planning to make. Have a rough shopping list in mind, and then you can pick the brains of the owner, who is a fountain of knowledge. You may not know left from right, up from down, but she knows everything.
And she’s not precious; you are welcome to rummage to your heart’s content in this collection of yarn for sale. No problem. I was opening bags, squishing yarn, and having the best time. But you know, be respectful, too. That goes without saying.
Yarn Stocked At Be Inspired Fibres:
Um, what yarn isn’t?! Be Inspired Fibres had Sandnes Garn, Knitting for Olive, Adriafil, Black Elephant, Camarose, Filcolana, Gepard Garn, Isager and so on….
Fibre Yard, in Edinburgh’s Southside, was our second yarn shop in the city. I think we all agreed that it was our favourite.
This is my kind of yarn shop, carefully and cleverly curated to appeal to every maker. It’s a relatively new yarn shop in Edinburgh, opening in August last year. Already, it is building a name for itself and is firmly on the map for a full-on yarny pilgrimage.
We were all drawn to the yarn collections in this shop. Beautiful colour palettes made it difficult to resist. And what’s the point in resisting? Just go to the call. It’s a siren song in sheep fibres.
Michelle and I, outside Fibre Yard, ready to yarn shop til we drop
Yarns Stocked At Fibre Yard
Again, oooh, gorgeous yarn!! There’s Rauma Gran, KAOS yarn, De Rerum Natura, The Camels’ Yarn, Irish Artisan Yarns, Cardiff Cashmere… I bought Rauma Garn for a crochet shawl pattern I’m going to remake. And it’d be interesting to see how the KAOS works up, so a skein of that was purchased too.
Ginger Twist Studios
Ginger Twist Studio on Montrose Terrace is world-famous in the knitting and crochet community. It was our last stop of night one. They had a pre-Yarn Festival social on the Thursday night, so we popped along. I can absolutely see why it is a destination for yarny folk. It’s super colourful and friendly with lots of space. You could sit amongst the yarn for hours just staring and squishing, sniffing and smiling.
The last time I went to Ginger Twist Studios, it was in premises on the other side of the road. It’s a testament to its popularity that it’s now in a place that’s three times the size and stocks a plentiful bounty of beautiful wool.
I didn’t buy much here, but I added a heck of a lot to a future yarn shopping list.
Yarns Stocked At Ginger Twist
Fonty (wanty!), Ginger Twist’s own hand-dyed yarn, Wee County Yarns, WYS, Orkney Angora, Gepard Yarn, Garthenor and John Arbon Textiles, the list goes on. There is so much yarn here!
Kathy’s Knits
Kathy’s Knits has been on Broughton Street for over twenty years. It is a traditional yarn shop that holds a lot of classic UK yarns.
Kathy is an attentive yarn shop owner, spending time with customers to help them find precisely what they need for their next project. I thoroughly enjoyed watching, out of the corner of my eye, the time she invested with a young customer. Then I watched her joy, swatching new yarn – a brushed wool that acted like floof but was not floof. She let Fay have a go at her knitted swatch, too, sharing her delight at this new yarn.
Yarns Stocked at Kathy’s Knits
Annfield Farm (it’s on my list), Jamieson’s and Smith, Ripples Crafts, Uradale Yarns, West Yorkshire Spinners, and more. Again, if I’d had a suitcase, I am pretty sure some of this would have come home with me.
Getting inspo at Kathy’s Knits
Purchases From Yarn Shops In Edinburgh
Just to have a record of what I bought, here are a couple of photos of the wool I bought in the Edinburgh yarn shops. Pinks, greens and neutrals. Interesting. It was different at the yarn festival…
The Woolly Good Gathering 2026!
The Woolly Good Gathering is a yarn festival that takes place over two days. Plus some pre-event shenanigans to drum up the excitement. We didn’t go to the nighttime social as we had predicted in advance that we’d be too pooped to make the most of it.
The festival is in its third year now and has a true host of professionals behind the team who founded the event: Alyson Chu of Moorit magazine, Melinda and Gergely of Zakami Yarns, Susan Anderson from The Scottish Yarn Journal, Solveigh Lass-Evans of Iolair Yarns (I bought some! See below) and Alison Mayne of Knitropective.
A Thoughtful and Considered Yarn Festival
Woolly Good was held on a Friday and Saturday in mid-April – time is flying! I can tell you that the Saturday was most definitely the busiest of the two days. However, they do have a quiet session before doors open on the Saturday morning.
There is a big focus on inclusivity and making everyone feel comfortable and welcome. That is both for vendors and customers.
Also, you might find yarn shows where too many stalls are packed into big rooms. It gets hot, crowded and claustrophobic. Not at Woolly Good. There is space to move and places to sit. Nothing is squeezed in, and that creates a far more open and relaxed environment.
Yarn Shopping at An Edinburgh Yarn Festival
I am astounded to admit that I didn’t buy as much as I thought I might. However, I was restricted to just a rucksack as I was travelling light. So whilst I fell in love with a lot of different vendors and their yarns, I couldn’t allow myself to go in all guns blazing. It was probably quite fortuitous, really. It’s not like I neeeeed any more yarn.
Yarn Vendors That Caught My Eye
I always have my faves at yarn shows, and the Woolly Good Gathering was no exception. It’s lovely to catch up with yarn dyers that you’ve met before. And meet new people, too. I feel like I’m getting to know people better each time I visit shows. Don’t get me wrong, I am still actually quite shy at these events and thrive more when I am with people I trust. But anyway, I digress…
Let’s list my faves, the ones that I wish I could have, always, at a dream festival in a room in my house. Whether it’s colour or fibre, I loved practically everything.
Between yarn shopping in Edinburgh, yarn shopping further north and the yarn festival, I chose to buy mostly from Scottish businesses as that felt like a special thing to do.
Thematically, the yarn I bought is all quite similar tones, which I didn’t realise until I got home!
Iolair Yarn – a sky blue, lace weight suri alpaca and silk blend with 2 DK skeins of a BFL & alpaca blend. Maybe I will crochet a Cirrus.
Eleanor Shadow – A speckled sock-weight merino superwash that I’d like to pair with a mohair. Not sure what I’ll make yet.
Skein and The Stitch – I broke my “buy from Scottish vendors” rule for this one! These two non-superwash merino DK yarns will either be a Cerberus shawl(without a border) or a Barking Mad scarf. I am edging towards the first option.
I also bought some labels to go in finished objects, a bag made of vintage fabrics and a knitting pattern.
Woolly Good Gathering Talks and Workshops
One of these days, I will pay more attention to the talks and workshops that are organised for yarn festivals. I never used to even take a second glance, but honestly, I think I’ve been missing a trick.
We attended the History of Crochet in 100 Objects, a talk by Eleanor Gilchrist. It was fascinating, and I want to learn more! Eleanor is working on her PHD on the history of crochet, so I hope her work is published as a book at some point in the future.
Other Places to Find Yarn in Edinburgh
We stayed in an apartment very near a clothing shop called Ragamuffin. They had Zakami yarn in the window and West Yorkshire Spinners inside. It was a lovely shop full of colourful inspiration. Lots of sweaters and accessories in fairisle styles.
On the other side of our accommodation was the Scottish Textile Showcase, a small but luxurious shop selling knitwear, woollens and yep, yarn! I had not heard of this store, but clearly others had. We arrived shortly after the doors opened, and then so did everyone else. It’s not surprising, though. I would love to explore this place further.
Yarn in Sostrene Green
If you want half-decent cotton yarn for knitting or crochet, make your way to Waverly for a quick stop at Sostrene Green. They have loads of colours in a really nice layout. It’s easy to see all the yarn they have. I am not certain that I’d recommend any of the other yarn blends, but I have used their cotton, and I can attest to the fact that it is just as good as other cotton yarns on the market.
That was my last yarn shop in Edinburgh before I got the tram to the airport.
Yarn Shopping in Edinburgh, a Vlog
Eventually, all good things must come to an end; it was time to go home. I don’t think I can bring myself to tell you about the airport stress of almost not getting my flight home. But I do tell you about it in my video about Edinburgh’s yarn hot spots on my YouTube video.
Yarn Shopping in Edinburgh, or in any place for that matter, is exciting, right? So it makes me want to talk about it. Therefore, why not check out my crochet podcast on YouTube where I talk about what happened on this yarny trip to Scotland?!
Places to Eat in Edinburgh
Not to confuse things, but before I go, I must indulge and share some of the tasty things we ate. We were really lucky, and everything we chose was amazing.
Herringbone for supper on the first night. It was very reasonable, and we all had yummy light bites and a glass of wine. The house white was pretty good. The restaurant used to be a public toilet – you’d never guess!
At Woolly Good, they had two catering stands plus some tasty cakes and drinks inside. On Friday, we chose Harajuku for modern Japanese food. OMG, it was delicious! And juicy, too. Fay will confirm.
On the second night, we happened upon Ciao Roma, which wasn’t expensive and served bloody good Italian food.
For breakfast the next day, we had it on good authority that we needed to try Rocksalt. Wow! It was truly scrumptious. I chose to have the Turkish breakfast, and it was enormous. I now have Sujcuk on my shopping list. I didn’t need to eat again until the end of the day (when I found Seoul Bird at Edinburgh airport – also yum!).
Home Time
My 9 pm flight left (with me on it, thankfully – almost didn’t get let on due to overselling seats), and I flew towards home. I felt very fortunate that the husband was amenable to collection from Bristol Airport. We got home about midnight on the Saturday, and after all that travel for both of us (he was main driver for getting to Scotland in the first place), well, we were done in!
The best thing about that midnight drive was seeing a badger bumble across the road in front of us. No wonder they get squashed all the time. No sense of urgency whatsoever!
Right, seeing as I’m talking about airports and badgers, I think it’s time to sign off. I hope you enjoyed reading about the yarn as much as I enjoyed squishing it!
Cheers. x
PS…
Here are some extra images sharing our time yarn shopping in Edinburgh. They didn’t fit in the post, but it’s good to see a bit more of the city. There are the stairs of our apartment, which I was particularly taken with, a cool car, and paintings that were in “my” bedroom. And I really want to knit that brown jumper.
In the spring of last year, my sister told me she was having another baby. Therefore, I immediately started making granny squares for a cute little baby blanket. It was the ideal opportunity to work on a tutorial for the Continuous Join As You Go technique. Is it weird to use real-life stuff for crochet blog content?! No, of course not!
The granny squares waited a long time for me to put together with a very simple CJAYG method. For ten months, the squares sat waiting for their Continuous JAYG treatment. I was very late. I gifted the baby blanket last week, when we went to Scotland for a few days. Its recipient is now three and a half months old! Whoops. Do you think I’ll be forgiven?
What Is CJAYG?
The Continuous Join As You Go (or CJAYG) is a really quick and seamless way to join granny squares with the same yarn. No cutting! No rejoining! No ends to sew in! Rejoice!
This crochet joining method looks complicated, but once you make the first couple of steps, I find it clicks into place super fast. However, sometimes I need a reminder of the order in which to join the granny squares, so I draw myself a little map!
Video Tutorial for Continuous Join As You Go
The CJAYG road map is very, very handy. But what’s really handy is a video tutorial to demonstrate each step of how to continuously work around the outside of granny squares to bring them together in one beautiful crochet blanket.
I have put together a video tutorial for you so that you can see how I use a Continuous Join As You Go to make a blanket in one cohesive way.
The Difference Between JAYG and CJAYG
The Continuous Join As You Go (CJAYG), as established, uses the same yarn all in one, with no cutting. However, JAYG, or Join As You Go, does require the yarn to be cut.
I use JAYG if my granny squares are going to have different colours on the last round of each motif. There are still ends to weave in, but at least you don’t have to sew anything together. It’s also nice and quick to crochet, as well.
JAYG is perfect for colourful granny squares, but you can also use it for other stitches too. There’s a different JAYG technique for Corner 2 Corner crochet, for example. I use that in my Mixed Tape Melody blanket and my Milis sweater.
What To Watch Out for When Using Continuous Join As You Go
My most common mistake when using Continuous Join As You Go is that I accidentally miss a space between granny clusters. Instead, I’ll slip stitch into the following space and get all confused when the squares don’t match. It’s a simple fix. If something feels wonky, check, spot the error and undo. The chances are, you won’t have gone too far before you spot this mistake.
In the photo below, I have done exactly this. If you look closely, you’ll see that I didn’t slip stitch between the first and second granny clusters on the right-hand square. I noticed when I got to the next corner, the clusters were out of sync. It took no time to redo, and the crisis was averted!
I quite often accidentally join the wrong sides together, too, and start creating weird 3D shapes. It’s not anything to panic about. Again, check often and just redo.
Top Tips to Organise Your CJAYG Squares
There are a couple of other useful things that I think are helpful for this Continuous Join As You Go method:
Pop a stitch marker into the very first stitch you made. This is your first corner, and it helps you keep track of the direction you’re working in.
Arrange each row of granny squares in organised piles so that you can reach for them when it’s time to do the next row. If it’s a big blanket, tie them in separate numbered bundles so you maintain the order in which you want them to be.
Check often, lay your blanket out now and then to ensure there are no mistakes.
If it’s a new technique for you, it’s a good one to work on at a table or on the floor at first. It’s not essential, obviously, but I think it stops rogue squares pushing in where they are not supposed to be. It maintains the square order more easily and helps you join squares in the right place.
Colours To Choose For a CJAYG Granny Square Blanket
So, you’ll need one colour for your CJAYG round. Ensure you have a couple of hundred grams for a baby-sized blanket, more if it’s bigger. This should be enough for the joining of squares, plus a cute crochet border. I like to choose a neutral colour to do this when there are lots of colourful granny squares.
Crocheting a granny square baby blanket is a great opportunity to play with colourful yarn. If you’re not that confident in knowing how to arrange the colours for each round of granny squares, let me show you one way I approach it; guess who has a video tutorial!?
It’s from when I made the squares for this baby blanket back in June last year. I go through how to balance and distribute the colours among the squares in a super easy way.
A Finished Granny Square Blanket Using CJAYG
Wow! I had almost forgotten how long ago it was since I started this granny square blanket. It’s a relief and a pleasure to have it done and gifted. Let’s hope it gets lots of use. I know that my niece has been eyeballing it already, but she already has plenty of blankets – this one is for her little brother. What can I say, we’re a blanketty family!
The last rounds were worked in the car on the way to visit my new nephew in Scotland. It’s always last-minute with me! It was a very simple border consisting of as many granny rounds as I could get with the yarn I had (approx 200 grams).
The last round was 7dc (UK tr) scallops. Would you be interested in a pattern?!
As I am never able to ever stick to just one idea, Ceberus, my new houndstooth stitch shawl pattern, has three different triangle shapes and sizes to choose from!
Firstly, the pink and plum coloured design was created for Inside Crochet magazine, and I couldn’t stop thinking about how to wear it, how to style it, etc. Knowing that skinny scarves have been extraordinarily popular over the last few years, it seemed like I was missing a trick if I didn’t explore new ways of shaping this houndstooth stitch crochet shawl.
Whilst the idea is the same for all three houndstooth stitch patterns, as in they all use the same stitch pattern, ultimately, it’s just the rate of increases and decreases that changes.
There’s nothing scary about crocheting any Ceberus shawl. I absolutely love the basic stitches of houndstooth, hence why I’ve used it in a few crochet designs. For example, read about my love of the easy stitch pattern in the Barking Mad scarf, which is a free crochet pattern. And no doubt, I’ll also use it again in future crochet projects.
Once you have mastered basic crochet skills, you could easily make one of these houndstooth stitch shawl patterns. The question is, which one will you decide to make?!
Indeed, given the simple crochet stitches, it really is very easy to adapt, which is why I couldn’t stop at one shawl design. With an adjustment of the regularity in increases, the shape of the triangle changes. You can go from a deep triangle prayer shawl to the skinny scarf. And we have seen all skinny scarves through recent fashion trends within the handmade community.
A New Way to Crochet An I-Cord Edging
This crochet i-cord edging looks a teeny weeny bit intimidating; however, you’re going to love it! It is a very simple stitch, which is worked in the round. The more rows you work, consequently, the more it curls over itself. It sort of makes itself! Scroll on to see the picture of the pink i-cord ending. You only need to crochet around and around, and the curl appears.
It uses a double slip stitch. And just because you see the words “slip stitch” doesn’t make it fiddly, honest! It is actually much less faffy to work than a crochet slip stitch, and more fun too. Find more information about using a double slip stitch design for a crochet i-cord, here.
A Houndstooth Stitch Shawl Pattern
Cerbeus is available to purchase from the usual places. Please visit my Ravelry store here. Upon purchase, you receive both US & UK crochet terminology. And if you’re not a Rav user, then I also have copies of Cerberus in my Etsy shop.
Try a Houndstooth Stitch Pattern in Colour-Changing Yarn
The result of using Scheepjes Stone Washed Minerals is really pleasing! The crochet shawl, pictured above, alternates rows with a graphite shade of the Stone Washed range. It was a bit of a prototype, which roughly follows the shallow shawl version, but I made it with fewer repeats. Such pretty rainbow colours!
Or, how about just one colour…
Another version of Cerberus is made using indie dyed yarn. One skein, I picked up at a yarn festival; it’s Urban Purl. Oh my goodness, she dyes totally GORGEOUScolourways. And the pink edging is a bright pop of yarn from Qing Fibre. Both yarns are worsted weight, and I used the Skinny Cerberus pattern with 6 additional reps.
A houndstooth stitch shawl pattern. Crochet Cerberus,Cerberus is a houndsttich stitch shawl pattern in three different triangle shapes.
What do you think, do you like it? Which houndstooth shawl pattern will you make first?! Next up my sleeve is to make a DK-weight version. Don’t get me wrong, you know I love to use mohair yarn for crochet projects, but this pattern doesn’t rely on using fluffy yarn. I’m pretty sure you could make any of these crochet shawls in a variety of different yarns. Honestly, the results would be utterly fabulous, I’m sure!
The Aster Granny Square Scarf is the ultimate in quick-fix crochet. I came up with this scarf idea when I was supposed to be working on a crochet commission and was putting off the hard work. I was procraftinating, if you like. Essentially, I was seeking out yarny gratification in making mindful granny squares. I know I’m approaching burnout when I reach for their easy, reassuring comfort.
But sometimes, granny squares are a bit too simple, you know? I wanted to turn them into a project that was a little bit more special. Nothing too crazy, but seeing as I already have a habit of turning these crochet squares on their sides, it seemed a simple way of making a scarf a touch more fun and interesting.
The Aster Granny Square Scarf is available to purchase from Etsy, or you can grab it from the Zeens Roger Ravelry store, too. The ad-free PDF pattern includes schematics, full written instructions, step-by-step photos of the Join As You Go technique, as well as useful crochet charts. The information you’re about to read below is more of a recipe.
I also created a video tutorial showing you how to crochet the granny square scarf in all its different stages.
Aster Granny Square Scarf In a Nutshell
There is some useful information below, but you may be confident enough to go for it with just the bare bones of the scarf recipe. With that in mind, here’s a TLDR of how to make the Aster Granny Square Scarf in a few key points:
Grab a 4mm crochet hook and your DK yarn stash (approx 50g for the headscarf, 100g for the necktie & 150g for the longer scarf)
For JAYG, make lots of 2 round granny squares.
For JAYG, make twice as many granny triangles.
Sew in all their ends now!
If using mattress stitch to sew together – work the square and triangles all with 3 rounds.
Join squares with your preferred method.
Work crochet edging – the pattern is written below and shown in the vid tutorial.
There isn’t anything particularly difficult in the Aster Granny Square Scarf; in fact, it’s super easy to make. And it is pretty versatile too.
Whether you would like to crochet a necktie version or a longer, more traditional scarf, the choice is yours. Perhaps it’ll depend on how much yarn stash you have, but you could make the Aster scarf in any length you like. You could add more rounds to the squares, use just one colour or alllll the colours.
In this pattern, you have many options. How about a headscarf too?
A Granny Square Headscarf
Of course, if you don’t want crochet around your neck, how about a granny square headscarf? It’s the same pattern, just with a tweak or two! I would actually love to make a headscarf in 4ply yarn too, it would look very delicate and lacey, just perfect for spring/summer.
The Aster Headscarf incorporates ties in the first round of the edging. It is not difficult to do. In the video tutorial, I used US single crochet stitches for the ties, but I’ve since changed my mind. I highly recommend swapping to slip stitch instead. The ties aren’t quite so thick with slip stitches.
Aster Granny Square Scarf Measurements
When using a 4mm crochet hook and DK wool yarn, 1 square measures approx: 10cm / 4 inches, on the diagonal. Or 7cm / 2.75 inches down a square side.
Width of all patterns: 11cm / 4.25 inches. Little Granny Scarves: 90cm / 35.5 inches. Long Granny Scaves: 140cm / 55 inches. Granny headscarf length (inc. 2x 26cm ties): 92cm / 36.25 inches each.
How To Crochet The Aster Granny Square Scarf
Yarn For Your Aster Granny Square Scarf
I used wool DK yarn. My fave is merino, but you can use any yarn you like for a crochet project like this. A couple of yarn brands I’m currently obsessed with are Drops and Yarnsmiths. King Cole has a couple of nice options, too. They all have DK yarn balls in 50-gram skeins, which are ideal for small crochet projects.
To make the Aster Granny scarf, you need:
4mm crochet hook
DK yarn – depending on the size you make, you’ll need approximately:
Little Scarf – Less than 220m/240yds/100g of DK yarn. Include 1x50g of main colour if stashbusting, OR 2x50g if monochrome.
Long Scarf – Less than 330m/360yds/150g of DK yarn. Include 2x50g of main colour, if stashbusting, OR 3x50g if monochrome.
Headscarf – Yarnsmiths Merino DK, 100% Merino Wool (110m/120yd/50g). 1 ball in Multi Tweed (T3820)
A list of my current favourite DK wool yarns that come in 50g balls (and scraps of which feature in these crochet projects).
King Cole Majestic 20% Polyamide (50% Wool, 30% Acrylic (121m/132yds/50g)
WYS Bo Peep 48% Nylon, 52% Wool (112m/122yds/50g)
Suppose you don’t want to use these, not a problem. Check out some more info about Yarn Substitution, or go completely off piste. You could use fluffy yarn, cotton yarn (for a light, summer crochet scarf), or acrylic would work brilliantly, too. Choose whatever you have in your yarn stash.
Making Granny Squares – How Many?!
This easy crochet scarf is all about the granny squares. If you know how to crochet granny squares, you can make this scarf. Or even if you don’t, try it as your beginner crochet project. I show you how to make granny squares (and the triangles) in the video tutorial.
The granny squares are on the diagonal, so the way to work out how long you want your scarf to be is to measure from corner to corner across the diagonal. Multiply that number by the number of squares you think will be right.
Is it the length you want? No? Add or take away one, two, three squares. Play around with the length. Make one that’s 8 or 9 squares long, make one that measures 30 feet!
The angled point necktie is a length of eight 3-round squares, plus the triangle ends. The long Aster granny square scarf with its symmetrical points is 14 squares long.
Making Crochet Granny Triangles. How Many?!
You also need to crochet granny triangles to straighten along the scarf edges. The number of granny triangles needed depends on the way you want the pointed ends to look. For the angled pointed scarf, you need double the quantity of triangles as granny squares.
For example, my Little angled point scarf has 8 squares and 16 triangles. However, if you’re planning on a symmetrical point at the ends of the scarf, it’s double the quantity plus one extra square. I.e, 9 squares and 16 triangles.
A Versatile Granny Scarf
You might have guessed by now that you can make plenty of simple adjustments to the Aster Granny Square Scarf so that you have something unique in your handmade wardrobe.
As mentioned above, the number of granny triangles you need depends on whether you want to end with an angled point or a symmetrical point. You can see from the photos that there are two options.
You can make it in any yarn fibre and you can make it in any length. You can even add more rounds to the squares and triangles to make them bigger. Not only do you have these options (don’t you just love how adaptable crochet is?!), you can also join the squares in different ways depending on your whims and ways…
JAYG Granny Square or Sewing With Mattress Stitch?
I have made four versions of the Aster Granny Square Scarf. Actually, five, including the headscarf. Because of the quick-fix crochet satisfaction, I much prefer the Join As You Go method. JAYG works brilliantly for grannies, and you can join scarf squares in an evening.
However, using a mattress stitch to sew granny squares together is the best way of joining for a neat sewing method. Sewing the squares together definitely takes longer, but not everyone likes JAYG, so it’s good to have a different technique to choose from.
When it comes to arranging the colour order of granny squares, I very rarely do anything other than follow my gut. I also make sure I have a fresh cup of tea, the TV remote and plenty of room to plan which squares sit next to which. The best course of action for a stash busting scarf like this is to not think about it too much!
Despite the photo above showing granny squares lined up on the sofa, I actually normally do this on the floor.
Easy Mini Bobble Crochet Edging
Once again, I want this project to be the ultimate in Mindful Crochet, so the mini bobble edging is quick and easy. You’ll find it timestamped in the video tutorial, so if you need a helping hand, you have it!
The Mini Bobble Stitch instructions: This stitch is worked on the wrong side of the scarf/headscarf Yo (yarn over), insert hook in st, yo and pull through, ch1 (3 loops on hook), yo, insert hook in same st, yo, pull through (5 loops on hook), yo, pull through all 5 loops on hook.
With the right side of the scarf facing you, join the yarn to any stitch. Round 1: Ch1, 2sc in bar of horizontal dc sts, 1sc in corner ch-sps of squares, 1sc in centre circles of triangles, 3sc in scarf end points, continue in pattern around, join with sl st to first st, turn. – I am not going to worry about stitch count for this, it just isn’t worth the bother, and if you’re a stitch or two out, does it matter?!
Round 2 (Wrong Side): *1 mini bobble, 2sl st; rep from * around, join with sl st. Fasten off and cut yarn.
Blocking Your Aster Granny Square Scarf
Blocking your crochet turns your work from OK to exceptional! It smooths out stitches and irons out wrinkles and potential warping. I highly recommend it. For my scarves, I chose to steam block them.
The moisture and heat from the steamer are enough to set the stitches beautifully. Steaming also doesn’t take as long as wet blocking, so if you’re in a hurry, it is perfect. A few hours of resting and Hey Presto!
Granny Square Scarves Forever!
If you would like to have all the details (and more) in one place (without the ads!), the PDF pattern is available for purchase from my Ravelry store, or you can also buy a copy (as well as my other crochet patterns) from my Etsy shop)
If you are looking for more Granny crochet inspiration, check out my Free Crochet Patterns. Let me know what you’re going to make next!
Cheers! x
New Addition: Red Aster Scarf!
Halloooo, the Red Aster granny square scarf is also available as part of the collection. When you purchase the pattern, you automatically get the Red Aster info as a bonus feature. Or you can find out how to make Red Aster for free, here.