Please see below for any links to yarn, crochet patterns and other good stuff.
All the Crochet Good Stuff:
See My Vest is coming soon. It is still in the testing phase. I will let you know as soon as possible when it is ready.
Hobbii Fluffy Day yarn features in one of my granny vests, and I have made a Miu Miu inspired granny stripe crochet scarf too. I need to find the time to put together a blog post and video tutorial for this scarf because it is super easy and looks great.
Speaking of blog posts. I did actually manage to get one out this week. If you are curious to have an overview about gauge in your crochet garments, go HERE to read my tips and tricks. Gauge is soooo important!!
I am using Get Your Fluff On by Hobbycraft for a new cardi design. Will keep you posted.
You can watch my books vids HERE and HERE. I split it into two because it would have been quite long as one.
I will be at the John Arbon Textiles Mill Open Weekend in June. More on this on the next episode because I don’t feel like I have given you enough info about this!
First off I want to tell you that the concept of gauge (or tension) is actually pretty easy. It is most important for handmade garments but it is super useful to have a basic understanding for any crochet or knitting that you do. So, what is it?
Basically, gauge is measuring how many stitches and rows you have within a specific area of crochet or knit fabric. Most commonly, 10×10 cm (4×4 inches) is used. Making a small swatch of at least 15cm (6 inches) square will mean you can use a tape measure against that swatch to count how many stitches and rows you have over 10cm. Making the swatch slightly bigger means it’s more accurate. Those stitches in the middle of your swatch will be a better representation of the stitches in a garment, as opposed to the ones around the edge.
If you want the garments you make to work out as a designer intended, then I’m very sorry, you really must make time to work up a lovely swatch! Ignoring this important step before you start on the project itself, and you are at risk of messing it up!
Meeting gauge is matching the measurements given in a pattern. To do this more successfully, start with the same yarn weight that is suggested in the pattern and use the recommended hook size. You can’t use any yarn you want. It just doesn’t work that way!
How to Measure Gauge
OK, so you know what gauge is now (I hope!) but how do you measure it? It can sometimes be difficult to find precisely where a stitch begins and ends (fluffy yarns are my foe here). For the longest time I didn’t really think this was an issue and just kinda guessed at it. However, since I’ve started designing and grading crochet garments I have come to rely heavily on accuracy. You need to as well.
Below is a paragraph on blocking. Before you get out your tape measure, do you need to block your swatch first? Yarn changes after wearing and washing. I block everything apart from 100% acrylic. And I block swatches. I will tell you more in a sec.
To measure stitches, lay out your measuring device (ruler, tape measure, whatever) then count how many stitches you have in a 10cm / 4 inch length. Do the same for rows. Put the first end between two stitches rather than at the beginning of one. The spaces between stitches count towards the measurement. This is more relevant with lace patterns and heavier yarn weights because the spaces between stitches will most likely be bigger.
Not Meeting Gauge
As I suggested above, you are basically at risk of messing up your project if your rows and stitches don’t match those in the pattern you’re following. It is literally the most important step in crocheting handmade garments. Yeah, I know it’s not exciting but come on, suck it up. You can do it!
If you meet gauge and have the same number of stitches and rows as the pattern, then Bingo, get crocheting asap! If not, sorry, you are likely going to have to swatch again. How many stitches did you get? If you have fewer stitches than you need per 10cm, try going down a hook size. If you have more stitches, then go up a hook size.
If it’s a drastic difference, then perhaps the yarn isn’t suitable for the project, and you need to rethink. For example, it is not recommended to use a 4ply for a DK pattern. Don’t buy Chunky/Bulky when the pattern says to use Worsted! I’ve been there, I understand, but we are in an age where there are loads of yarns to choose from, loads of patterns. Please match the yarn weight and yardage/metreage to the pattern.
Crochet’s Golden Loop
I did not know this had a name until recently! I was aware that, depending on the person, the working loop on the hook has a different tension, and I had heard the names for each, but apparently, the trio of Yanker, Rider and Lifter are known as the Golden Loops. They will determine the height of your stitches. If you’re not meeting gauge on your row height, this is probably why. None of them are right or wrong but if you’re aware of your crochet style you can make adjustments to the change gauge, and therefore, row height.
Are You a Bit of a Yanker?
You’re a Yanker if the loop on your hook is tight from drawing the hook down and close to the work.
Enjoy being a Rider?
Your hook is held level with the fabric as you pull through. Neither too tight or too loose. Arguably the most balanced.
Maybe you’re a Lifter?
This is me. I lift my hook upwards as I work each stitch, especially when crocheting quickly. It’s the reason I get quite tall stitches.
Blocking your Swatch
I briefly mentioned blocking a moment ago, this comes into play for swatching too. If using natural fibres, a pattern will probably suggest gently washing and pinning a swatch out to dry. Or, if it doesn’t, but it says to block the final thing, please assume that you’re blocking the swatch too. Yep, it does mean things take longer. Once again: sorry!
Once your swatch is dry, take gauge measurements from that. Natural fibres act differently from acrylic and will stretch and drape differently once washed and dried. I don’t block acrylic because it doesn’t behave the same way. It keeps its shape quite well for the most part. I have killed acrylic swatches in the past by aggressively steam blocking. I don’t want to melt 20+ hours of work, thanks very much. If it’s acrylic blended with natural fibres, then I will risk a gentle steam blocking. Just be very very careful!
Replace your tape measure on a regular basis. The cheaper, plasticky ones will stretch with lots of use and therefore lead to incorrect numbers.
Make your swatch at least 15cm square. I have heard of people only measuring 5cm and doubling it. For a garment, NO! Don’t do that, it allows more room for error. Big bad No!
Set your tape measure to start evenly between two stitches. That seemingly inconsequential space adds up when multiplied.
Swap to a bigger or smaller hook size if you aren’t meeting gauge.
Watch how you crochet. Are you a Yanker, Rider, or Lifter? This will affect row height.
Burn it into your brain that swatching is always part of the garment making process.
Use the recommended yarn weight. Look at the yardage/metreage per hundred grams for matchy matchy figures.
Dodgy Gauge
There are a few consequences of ignoring gauge. The biggie: hours and hours have been potentially wasted because you’ve made a garment that doesn’t fit. You might also run out of yarn, which means you have to buy more. But what if the shop doesn’t have the same dye lot anymore? You end up with half the left sleeve is a different shade of grey. Plus, you ordered even more yarn to get free postage and now you have loads of leftovers that will sit in the cupboard for three years.
Halllooooo, and welcome to the Zeens & Roger Crochet Podcast (vlogcast)!! The latest video squeezes in loads of crochet good stuff so please click on the image above to watch or go to my YouTube channel HERE.
Links to the Crochet Good Stuff:
Isca is now released!! Isca is a rib & bobble crochet cowl design with matching headband / crochet ear warmer. There is 25% off until the 25th Feb. Use the code ISCA25 on Ravelry & Etsy to get the new release discount.
The yarn I used for Isca is from Along Avec Anna. Anna has a new shop in Exeter selling her beautiful yarn and knitting patterns.
I briefly mentioned a free C2C cowl pattern. You can find that HERE.
Nomad Stitches. This online course about the basics of grading and garment construction has been invaluable. But I do have homework to do! Follow Sandra to hear about similar courses about crochet design.
Inside Crochet – issue 144 has the Riley jumper, plus an interview with me. And an additional 2 patterns in a pretty shawl supplement.
Hotchpotch crochet grannies. I have a thing about hotchpotch granny projects. Mostly bags and purses. Here is a link to a how to make a little purse.
Kate from Jellybean Junction has just released a lovely new crochet book. Lots of quick fix crochet for when you need a yarn hit. I’m working on one of the patterns as part of a book tour. It has a real mix of pretty projects for yourself and your home.
One of the garment ideas I have, and would like to design using the new grading skills I’ve been learning this last year, is a cardigan. I did want a raglan design construction but with the stitch pattern I want to use, I’m not yet certain how to tackle it. So a drop sleeve it is for this one! I am using Hobbii Yarn called Fluffy Day, which was sent to me as a gift. It’s the perfect electric blue and has a lovely brushed look , which is currently all the rage! I have a few swatches and I’m nearly ready to put those numbers into a spreadsheet!
Lastly, I have a new design with Scheepjes! It’s called Rainbow Interrupted, a pretty crescent shawl using Scheepjes Metropolis. It’s such nice yarn to use. A proper buttery, soft one.
Come and join the Patreon party!! We meet up every month for a Zoom chat and there is usually a free pattern every month, plus behind the scenes catch ups too. Patreon support is hugely important to me. We are small but perfectly formed!
Hi, welcome to the Zeens and Roger Crochet podcast. Episode 97 is the first crochet vid of 2022 and for this year whenever I do a podcast I’m going to try and keep it to around 30 minutes. Let’s see if I can do it! Click on the pic above to go directly to the episode or go HERE to my YouTube channel where you’ll find all previous podcasts and crochet tutorials.
Links to all the Crochet Good Stuff:
The video with tips and advice on publishing your own crochet designs is HERE.
The latest issue of Inside Crochet magazine is out on the 20th January both digitally and in lots of retailers.
The Mohair blog post is HERE. Again, some good tips and advice on using mohair yarn in your crafty projects.
You can get my hat patterns:January Hues, Ansome and Seven Summits at a lower price until the end of the month. The code: HATJAN22 is valid until the 31st of January. You can use that on Ravelry and/or Etsy.
The Mixtape Medley Crochet Along has been such an exciting CAL and I cannot tell you how thrilling it is that so many of you have taken part in making this crazy crochet blanket pattern. There have been some brilliant brilliant brilliant versions made and it is such a lovely thing to see. Check out the Instagram hashtag #MixtapeMedleyCAL to see a variety of colour combinations that will make you swoon.
It’s about time I shared the pattern here on the blog (keep scrolling – it’s below!). I thought it would be a good idea to publish my biggest crochet project to date, right here, using US crochet terminology.
As well as scrolling down in this post, to full pattern with the US terms, you can find the UK pattern broken down in its CAL parts on the Hobbycraft website HERE. There are links to the video tutorials there too (I use UK terms in the videos).
You need any DK (or similar) yarn. That’s in the number 3 category. I used Knitcraft Everyday DK 50 gram balls (100% Acrylic, 137m/150yds) in the following colours:
Purple (YA) x 3 balls, Mint (YB) x 4, Hot Pink (YC) x 2 Beige (YD) x 5, Orange (YE) x 2, Teal (YF) x 2 Light Blue (YG) x 4, Brown (YH) x 2, Peach (YI) x 3 Barbie Pink (YJ) x 2, Red (YK) x 2, Blue (YL) x 2
I used a 3.75mm hook as my tension is quite loose. A 4mm (G/6) works great too.
BlanketMeasurements
This blanket measures 125cm x 195cm / 49 x 77 inches
Stitch Tension/ Crochet Gauge
Whilst tension isn’t a major issue it does have an affect on the amount of yarn used. The shade Peach for example, uses nearly every scrap of yarn of the three 50g balls listed. You would run out if your tension is looser.
If you’ve got the energy, make this small swatch to check you gauge. Row 1: Using a Foundation Start (see Special Stitches), work 25fdc sts, turn – 25 sts Row 2: 1ch, hdc to end, turn. Rows 3 – 17: Rep Row 2. 10cm should equal 14 rows /19 sts
Notes for Mixtape Medley
Changing colour: change yarn on the last pull through of the st before the new colour is needed.
For colour block/plaid rows, carry non working yarn along the row, working over the yarn as you go. Remember to regularly untwist your yarn to prevent tangles!
C2C rows can sometimes pull in slightly. You can adjust the tension by going up a hook for these sections. Although, I didn’t bother.
It’s a lovely big blanket and is a generous single bed size.
To adjust the size of your blanket, use multiples of 36. This blanket uses 6 multiples of 36 (plus 1) to get to 217 stitches. Add or subtract 36 stitches to make adjustments to the size.
The Hobbycraft video tutorials use UK terms but provide a really good visual so they’re still valid and helpful.
At the bottom of this page you’ll find a printable PDF to download for free!! ….
If you have enjoyed all the Mixtape Medley delights thus far and appreciate the work that has gone into the project, then I would totally do that happy dance if you bought me a Ko-fi!
Crochet Abbreviations
ch = chain, ch-sp = chain space, dc = double crochet, folls = follows/following, fdc = foundation double crochet, hk = hook, hdc = half double crochet, lp/s = loop(s), rem = remain/ing, rep = repeat, sc = single crochet sl st = slip stitch, st/s = stitches, tr = treble crochet, yrh = yarn around hook, YA/YB etc = yarn A/yarn B etc, JAYG = join as you go, C2C = corner to corner crochet, RS/WS = right side/wrong side
Special Crochet Stitches
Foundation Start (fdc):ch4 (counts as a st), yrh, insert hook in 4th ch from hook, yrh, draw through, yrh, draw through 1 lp (to create 1 ch into which the next st will be worked), yrh, draw through 2 lps, yrh, draw through 2 lps. Work next fdc (foundation double) into the 1ch created and the lp behind it.
Bobble stitch: (made on the wrong side of blanket): [yrh, insert hook into st, yrh, pull through, yrh, pull through 2 lps] five times in same st, yrh, pull through all 6 lps.
Puff stitch: [yrh, insert hook into st, yrh and pull up yarn] three times in same st, yrh, draw through all 7 lps on hook.
hdc join: (joining a round with a hdc means you finish in the very centre of a corner): yrh, insert hook into 1st st of round, yrh, pull through, yrh, pull through all 3 lps.
Mixtape Medley is a Hobbycraft collaboration for a 2021 Crochet Along
Mixtape Medley Blanket Pattern
Week 1
Row 1 (ws): With YA and 4mm hook, 217 fdc, turn – 217 sts. Alternatively work 219ch and work 1 dc in 4th ch from hk and 1dc in each ch to end. Row 2: 1ch (does not count as a st here and throughout), dc to end, turn. Change to YB.
BLOCKS
Row 3: 1ch, 9hdc in YB, *9hdc in YC, 9hdc in YB; rep from * to last 10 sts, hdc in YC to end, turn. Row 4: 1ch, 10hdc in YC, 9 hdc in YB, *9hdc in YC, 9hdc in YB; rep from * to end, turn. Row 5: rep Row 3. Row 6: rep Row 4. Row 7: rep Row 3. Row 8: rep Row 4 changing to YC on last st, turn. Row 9 -14: continue in pattern, repeat the last 6 rows but switch colours around to begin with YC followed by YB.
BOBBLE ROWS
Rows 15 & 16: with YD, 1ch, hdc to end, turn. Row 17 (ws): with YE, 1ch, 4sc, 1bobble, *8sc, 1 bobble; rep from * to last 5 sts, 5sc, turn. Rows 18 & 19: with YD 1ch, hdc to end, turn.
Week 2
JAYG C2C
This C2C section represents the next 6 rows of the blanket: Rows 20-25. Working on the diagonal, each row is anchored with a slip stitch to the main body of the blanket. You may wish to use a 4.5mm hook for this section. Increases Row 1 (rs): with YF, 6ch, 1dc in 4th ch from hk, 1dc in each of rem 2 ch (1 block made), miss 2 sts of main blanket, 1sl st, 3ch, miss 2 sts, 1sl st, turn – 1 block Row 2: 3ch, 3dc in 3ch-sp, 1sl st in ch-sp of first block, 3ch, 3dc in same sp, turn – 2 blocks. Row 3: 6ch, 1dc in 4th ch from hk, 1dc in each of next 2 ch, *1sl st in 3ch-sp, 3ch, 3dc in same ch-sp; rep from * once, miss 2 sts, 1sl st in next st, 3ch, miss 2 sts, 1sl st, turn – 3 blocks Row 4: 3ch, 3dc in ch-sp, *1sl st in next 3ch-sp, 3ch, 3dc; rep from * to end, turn – 4 blocks. Row 5: with YG, 6ch, 1dc in 4th ch from hk, 1dc in each of next 2 ch, *1sl st in 3ch-sp, 3ch, 3dc in same ch-sp; rep from * to end, miss 2sts, 1sl st, in next st, 3ch, miss 2 sts, 1sl st, turn – 5 blocks. Row 6: rep row 4 – 6 blocks.
Work even as folls: Row 7: 3 sl sts across dc sts and into 3ch-sp, 3ch, 3dc in 3ch-sp, *1sl st into next 3ch-sp, 3ch, 3dc in same 3ch-sp; rep from * to end, miss 2 sts, 1sl st, in next st, 3ch, miss 2 sts, 1sl st, turn – 6 blocks. Row 8: *3ch, 3dc in ch-sp, 1sl st in next 3ch-sp; rep from * to end, turn – 6 blocks. Row 9: Rep Row 7, changing to YF on fourth sl st into first ch-sp. Rows 10 – 71: rep Rows 8 & 9 to last st, alternating between YF & YG every four rows. Row 72: Rep row 8.
Decreases Row 73: 3sl st across dc sts and into 3ch-sp, *3ch, 3dc in 3ch-sp, 1sl st into next 3ch-sp; rep from * to end, turn – 5 blocks. Rows 74 – 77: rep row 73. Fasten off and sew in C2C ends (and all other ends so far)!
Row 26: with RS facing, attach YG in corner, work 217sc across main blanket: 1sc in top of the 3 vertical dc sts and 3sc around the bar of horizontal sts, plus an additional 1sc st at the beginning.
HOUNDSTOOTH
Row 27: with YH 1ch, hdc to end, turn. Row 28: 1ch, 1dc, *1sc, 1dc; rep from * to end, turn. Row 29: with YI, 1ch, 1sc, *1dc, 1sc; rep from * to end, turn. Row 30 – 33: Rep Rows 28 & 29 alternating colours. Row 34: with YH rep Row 28 once more. Row 35: rep Row 27.
BOBBLES x 3
Rows 36- 38: with YB 1ch, hdc to end, turn. Row 39 (ws): with YJ, 1ch, 4sc, 1bobble, *8sc, 1 bobble; rep from * to last 5 sts, 5sc, turn. Rows 40 – 42: rep row 36. Row 43: with YE, 1ch, *8sc, 1 bobble; rep from * to last 10 sts, 10sc, turn. Rows 44 – 46: rep row 36. Row 47: with YK, rep row 39. Row 48 – 50: rep row 36.
Week 3
PLAID
Row 51: with YL 1ch, 4hdc, *change to YG, 4hdc, change to YL, 4hdc; rep from * to last 5 sts, 5hdc in YG, turn. Row 52: 1ch, 5hdc, change to YL, 4hdc, *change to YG, 4hdc, change to YL, 4hdc; rep from to end, turn. Row 53: rep row 51. Row 54: With YL 1ch, 5hdc, change to YD, 4hdc, *change to YL, 4hdc, change to YD, 4hdc; rep from to end, turn. Row 55: 1ch, 4hdc, *change to YL, 4hdc, change to YD, 4hdc; rep from * to last 5 sts, 5hdc in YL, turn. Row 56: rep Row 54. Rows 57 – 59: rep rows 51- 53. Rows 60 – 62: rep rows 54 – 56. Rows 63 – 65: rep rows 51 – 53.
CLOSED SHELLS
Row 66: with YJ, 1ch, dc to end, turn. Row 67: with YH, 1ch, 3dc in first st, miss 2 sts, 1sc, miss 2 sts, *5dc in next st, miss 2 sts, 1sc, miss 2 sts; rep from * to last st, 3dc in last st, turn. Row 68: with YE,1ch, 1sc in first st, *miss 2 sts, 5dc in sc, miss 2 sts, 1sc in next st; rep from * to end, turn. Row 69: with YK rep row 67. Row 70: with YA rep row 68. Row 71: with YB rep row 67. Row 72: with YJ, 1ch, dc to end, turn.
Week 4
PUFF WAVES
Row 73: with YF, 1ch, hdc to end, turn. Row 74: 1ch, 3sc, 3hdc, 2dc, 3tr, 2dc, 3hdc, *5sc, 3hdc, 2dc, 3tr, 2dc, 3hdc; rep from * to last 3 sts, 3sc, turn. Rows 75 & 76: with YI, 1ch, sc to end, turn. Row 77: 1ch, 4dc, 3hdc, 5sc, 3hdc, *2dc, 3tr, 2dc, 3hdc, 5sc, 3hdc; rep from * to last 4 sts, 4dc, turn. Row 78: 1ch, 4dc, 3hdc, 5sc, 3hdc, *miss 3 sts, 1ch, (1puff, 1ch) three times in next tr, miss 3 sts, 3hdc, 5sc, 3hdc; rep from * to last 4 sts, 4dc, turn. Row 79: 1ch, 1sc in each st and 1ch-sp to end, turn. Row 80: 1ch, sc to end, turn. Row 81: 1ch, 3sc, 3hdc, 2dc, 3tr, 2dc, 3hdc, *5sc, 3hdc, 2dc, 3tr, 2dc, 3hdc; rep from * to last 3 sts, 3sc, turn. Row 82: 1ch, 3sc, 3hdc, miss 3 sts, 1ch, (1puff, 1ch) three times in next st, miss 3 sts, 3hdc, *5sc, 3hdc, miss 3 sts, 1ch, (1puff, 1ch) three times in next st, miss 3 sts, 3hdc; rep from * to last 3 sts, 3sc, turn. Row 83: rep row 79. Row 84: rep row 80. Row 85: rep row 77. Row 86: rep row 78. Row 87: rep row 79. Row 88: rep row 80. Row 89: With YF, rep row 81. Row 90: 1ch, hdc to end, turn.
GRANNY BLOCKS
Row 91: with YD, 1ch, sc to end, turn. Row 92: 1ch, 4dc, *miss 1 st, 1ch, 3dc; rep from * to last st, 1dc in last st, turn. Row 93: With YK, 1ch, 1sc, 3ch, miss 3 dc, *1sc in ch-sp, 3ch, miss 3 dc; rep from * to last st, 1sc, turn. Row 94: with YD, 1ch, 1dc in first st, 3dc in ch-sp, *1ch, miss sc, 3dc in ch-sp; rep from * to last st, 1dc in last st, turn. Row 95: with YC, rep row 93. Row 96: with YD, rep row 94. Row 97: with YL, rep row 93. Row 98: with YD, rep row 94. Row 99: 1ch, 1sc in each st and ch-sp to end, turn.
Week 5
BLOCKS
Row 100: with YB, 1ch, dc to end, turn. Row 101: 1ch, 9hdc in YA, *9hdc in YG, 9hdc in YA; rep from * to last 10 sts, hdc in YG to end, turn. Row 102: 1ch, 10hdc in YG, 9hdc in YA, *9hdc in YG, 9hdc in YA; rep from * to end, turn. Row 103: rep Row 101. Row 104: rep Row 102. Row 105: rep Row 101. Row 106: rep Row 102 changing to YG on last st, turn. Rows 107 – 112: continue in pattern by repeating the last 6 rows but switch colours around to begin with YG followed by YA
BOBBLE
Rows 113 & 114: with YD, 1ch, hdc to end, turn Row 115 (ws): with YH, 1ch, 4sc, 1bobble, *8sc, 1 bobble; rep from * to last 5 sts, 5sc, turn. Rows 116 & 117: with YD 1ch, hdc to end, turn.
JAYG C2C
This C2C section represents the next 6 rows of the blanket: Rows 118-123. Increases Row 1: with YK, 6ch, 1dc in 4th ch from hk, 1dc in each of next 2 ch (1 block made), miss 2 sts of main blanket, 1sl st, 3ch, miss 2 sts, 1sl st, turn – 1 block. Row 2: 3ch, 3dc in 3ch-sp, 1sl st in ch-sp of first block, 3ch, 3dc in same sp, turn – 2 blocks. Row 3: 6ch, 1dc in 4th ch from hk, 1dc in each of next 2 ch, *1sl st in 3ch-sp, 3ch, 3dc in same ch-sp; rep from * once, miss 2 sts, 1sl st in next st, 3ch, miss 2 sts, 1sl st, turn – 3 blocks Row 4: 3ch, 3dc in ch-sp, *1sl st in next 3ch-sp, 3ch, 3dc; rep from * to end, turn – 4 blocks. Row 5: with YJ, 6ch, 1dc in 4th ch from hk, 1dc in each of next 2 ch, *1sl st in 3ch-sp, 3ch, 3dc in same ch-sp; rep from * to end, miss 2 sts, 1sl st, in next st, 3ch, miss 2 sts, 1sl st, turn. – 5 blocks. Row 6: rep row 4 – 6 blocks.
Work even as folls: Row 7: 3sl sts across dc sts and into 3ch-sp, 3ch, 3dc in 3ch-sp, *1sl st into next 3ch-sp, 3ch, 3dc in same 3ch-sp; rep from * to end, miss 2 sts, 1sl st, in next st, 3ch, miss 2 sts, 1sl st, turn – 6 blocks. Row 8: *3ch, 3dc in ch-sp, 1sl st in next 3ch-sp; rep from * to end, turn – 6 blocks. Row 9: rep Row 7, changing to YK on fourth sl st into first ch-sp. Row 10 – 71: rep Rows 8 & 9 to last st, alternating between YJ & YK every four rows. Row 72: rep row 8.
Decreases Row 73: 3sl sts across dc sts and into 3ch-sp, *3ch, 3dc in 3ch-sp, 1sl st into next 3ch-sp; rep from * to end, turn. – 5 blocks. Rows 74 – 77: rep row 73. Sl st to corner, fasten off and sew in ends! Row 124: With RS facing, attach YJ in corner, 217sc across main blanket: 1sc in top of the 3 vertical dc sts and 3sc around the bar of horizontal sts, plus an additional 1sc st at the beginning.
Week 6
HOUNDSTOOTH
Row 125: with YE 1ch, hdc to end, turn. Row 126: 1ch, 1dc, *1sc, 1dc; rep from * to end, turn. Row 127: with YB 1ch, 1sc, *1dc, 1sc; rep from * to end, turn. Rows 128 – 131: Rep Rows 126 & 127 alternating colours. Row 132: with YE rep Row 126. Row 133: rep Row 125.
BOBBLES x 3
Rows 134 – 136: with YI, 1ch, hdc to end, turn. Row 137 (ws): with YF, 1ch, 4sc, 1bobble, *8sc, 1 bobble; rep from * to last 5 sts, 5sc, turn. Rows 138 – 140: rep Row 134. Row 141: with YL, 1ch, *8sc, 1 bobble; rep from * to last 10 sts, 10sc, turn. Rows 142 – 144: rep Row 134. Row 145: with YG, rep row 137. Row 146 – 148: rep Row 134.
PLAID
Row 149: with YK 1ch, 4hdc, *change to YC, 4hdc, change to YK, 4hdc; rep from * to last 5 sts, 5hdc in YC, turn. Row 150: 1ch, 5hdc, change to YK, 4hdc, *change to YC, 4hdc, change to YK, 4hdc; rep from to end, turn. Row 151: rep row 149. Row 152: with YK 1ch, 5hdc, change to YD, 4hdc, *change to YK, 4hdc, change to YD, 4hdc; rep from to end, turn. Row 153: with YD 1ch, 4hdc, *change to YK, 4hdc, change to YD, 4hdc; rep from * to last 5 sts, 5hdc in YK, turn. Row 154: rep Row 152. Rows 155 – 157: rep rows 149 – 151. Rows 158 – 160: rep rows 152 – 154. Rows 161 – 163: rep rows 149 – 151.
Week 7
CLOSED SHELLS
Row 164: with YH, 1ch, dc to end, turn. Row 165: with YB, 1ch, 3dc in first st, miss 2 sts, 1sc, miss 2 sts, *5dc in next st, miss 2 sts, 1sc, miss 2 sts; rep from * to last st, 3dc in last st, turn. Row 166: with YL, 1ch, 1sc in first st, *miss 2 sts, 5dc in sc, miss 2 sts, 1sc in next st; rep from * to end, turn. Row 167: with YG rep row 165. Row 168: with YE rep row 166. Row 169: with YI rep 165. Row 170: with YH, 1ch, dc to end, turn.
PUFF WAVES
Row 171: with YA, 1ch, hdc to end, turn. Row 172: 1ch, 3sc, 3hdc, 2dc, 3ddc, 2dc, 3hdc, *5sc, 3hdc, 2dc, 3ddc, 2dc, 3hdc; rep from * to last 3 sts, 3sc, turn. Rows 173 & 174: with YG, 1ch, sc to end, turn. Row 175: 1ch, 4dc, 3hdc, 5sc, 3hdc, *2dc, 3ddc, 2dc, 3hdc, 5sc, 3hdc; rep from * to last 4 sts, 4dc, turn. Row 176: 1ch, 4dc, 3hdc, 5sc, 3hdc, *miss 3 sts, 1ch, (1puff, 1ch) three times in next st, miss 3 sts, 3hdc, 5sc, 3hdc; rep from * to last 4 sts, 4dc, turn. Row 177: 1ch, sc in each st and 1ch-sp to end, turn. Row 178: 1ch, sc to end, turn. Row 179: 1ch, 3sc, 3hdc, 2dc, 3ddc, 2dc, 3hdc, *5sc, 3hdc, 2dc, 3ddc, 2dc, 3hdc; rep from * to last 3 sts, 3sc, turn. Row 180: 1ch, 3sc, 3hdc, miss 3 sts, 1ch, (1puff, 1ch) three times in next st, miss 3 sts, 3hdc, *5sc, 3hdc, miss 3 sts, 1ch, (1puff, 1ch) three times in next st, miss 3 sts, 3hdc; rep from * to last 3 sts, 3sc, turn. Row 181: rep row 177. Row 182: rep row 178. Row 183: rep row 175. Row 184: rep row 176. Row 185: rep row 177. Row 186: rep row 178. Row 187: With YA, rep row 179. Row 188: 1ch, hdc to end, turn.
GRANNY BLOCKS
Row 189: with YD, 1ch, sc to end, turn. Row 190: 1ch, 4dc, *miss 1st, 1ch, 3dc; rep from * to last st, 1dc in last st, turn. Row 191: With YF, 1ch, 1sc, 3ch, miss 3dc, *1sc in ch-sp, 3ch, miss 3dc; rep from * to last st, 1sc, turn. Row 192: with YD, 1ch, 1dc in first st, 3dc in ch-sp, *1ch, miss sc, 3dc in ch-sp; rep from * to last st, 1dc in last st, turn. Row 193: with YJ, rep row 191. Row 194: with YD, rep row 192. Row 195: with YK, rep row 191. Row 196: with YD, rep row 192. Row 197: 1ch, 1sc in each st and ch-sp to end, turn.
Week 8
JAYG C2C
This C2C section represents the next 6 rows of the blanket: Rows 198- 203. Increases Row 1: with YH, 6ch, 1dc in 4th ch from hk, 1dc in each of next 2 ch (1 block made), miss 2 sts, of main blanket, 1sl st, 3ch, miss 2 sts, 1sl st, turn – 1 block Row 2: 3ch, 3dc in 3ch sp, 1sl st in ch-sp of first block, 3ch, 3dc in the same sp, turn – 2 blocks. Row 3: 6ch, 1dc in 4th ch from hk, 1dc in each of next 2 ch, *1sl st in 3ch-sp, 3ch, 3dc in same ch-sp; rep from * once, miss 2sts, 1sl st in next st, 3ch, miss 2 sts, 1sl st, turn – 3 blocks Row 4: 3ch, 3dc in ch-sp, *1sl st in next 3ch-sp, 3ch, 3dc; rep from * to end, turn – 4 blocks. Row 5: with YB, 6ch, 1dc in 4th ch from hk, 1dc in each of next 2 ch, *1sl st in 3ch-sp, 3ch, 3dc in same ch-sp; rep from * to end, miss 2sts, 1sl st, in next st, 3ch, miss 2 sts, 1sl st, turn – 5 blocks. Row 6: rep row 4 – 6 blocks.
Work even as folls: Row 7: 3sl sts across dc sts and into 3ch-sp, 3ch, 3dc in 3ch-sp, *1sl st into next 3ch-sp, 3ch, 3dc in same 3ch-sp; rep from * to end, miss 2 sts, 1sl st, in next st, 3ch, miss 2 sts, 1sl st, turn – 6 blocks. Row 8: *3ch, 3dc in ch-sp, 1sl st in next 3ch-sp; rep from * to end, turn – 6 blocks. Row 9: rep Row 7, changing to YH on fourth sl st into first ch-sp. Row 10 – 71: rep Rows 8 & 9 to last st, alternating between YB & YH every four rows. Row 72: rep row 8.
Decreases Row 73: 3sl sts across dc sts and into 3ch-sp, *3ch, 3dc in 3ch-sp, 1sl st into next 3ch-sp; rep from * to end, turn – 5 blocks. Rows 74 – 77: rep row 73. Sl st to corner, fasten off and sew in ends now. Row 204: With RS facing, attach YB in corner, 217sc across main blanket: sc in top of 3 vertical dc sts and 3sc around the bar of horizontal sts, plus additional 1sc st at beginning.
BOBBLE ROWS
Rows 205 & 206: with YD, 1ch, hdc to end, turn. Row 207 (ws): with YF, 1ch, 4sc, 1bobble, *8sc, 1 bobble; rep from * to last 5 sts, 5sc, turn. Rows 208 & 209: with YD 1ch, hdc to end, turn.
BLOCKS
Row 210: 1ch, 9hdc in YE, *9hdc in YJ, 9hdc in YE; rep from * to last 10 sts, hdc in YJ to end, turn. Row 211: 1ch, 10hdc in YJ, 9hdc in YE, *9hdc in YJ, 9hdc in YE; rep from * to end, turn. Row 212: rep 210 Row 213: rep 211 Row 214: rep 210 Row 215: rep 211 changing to yarn J on last st, turn. Rows 216 -221: continue in pattern, repeat the last 6 rows but switch colours around to begin with YJ followed by YE Rows 222 & 223: with YA, 1ch, dc to end, turn.
THE MIXTAPE MEDLEYBORDER
Continue around the rest of the blanket and join with a sl st to the first st, do not turn. If you are just a few stitches out on the sides, don’t worry, it won’t have an effect on the overall look.
Rnd 1: With YD, 1ch, sc to end – 217 sts, work along the side of the blanket as folls: 1sc in first dc, 2sc in 2nd dc (& further dc sts), work 3sc for every two rows in hdc, 1sc in each sc row. For C2C sections, work 3dc across vertical dc sts and 2sc in horizontal posts. – 334 sts.
Rnd 2: 1ch, 2dc in first st, dc to next corner st, *(2dc, 1ch, 2dc) in corner st, dc to next corner; rep from * twice more, 2dc, join by working 1hdc into the first st, do not turn.
Rnd 3: 1ch, 2dc in corner sp, dc to next corner, *5dc in corner sp, dc to end; rep from * three more times, 3dc in first corner sp, join with sl st to first st .
Fasten off and sew in the many many ends!
Mixtape Medley lounging at home.
Wahoo, you are done! How does it feel? Honestly, I was so pleased when this one came off the hook. It was many months of planning and swatching. What a relief and a joy to see it finished.
You’re probably down at the botom of this page to find a totally free PDF that you can download and print. Well, you canfind that just below. It’s one document with the pattern fully laid out week by week (obvs you can ignore the weeks and work it up as quickly as you like but they’re useful markers).
This c2c crochet cowl pattern featured in a Mindful Makes supplement from Mollie Makes magazine a few years ago. I had forgotten about it entirely. The other day, however, I was chatting with a couple of fellow designer friends and both of them said they intended on revisiting past patterns this year. It’s a really good New Year intention and I fancy jumping on that bandwagon! (Most designers have a backlog of projects they sit on that aren’t quite ready for whatever reason).
With the feeling of the January doldrums rolling in, I have found the perfect pattern to revisit. It’s a gentle introduction to the crochet c2c stitch, which is ideal for a beginner crocheter, or it’s also a really nice pattern if you’re just looking for something easy and calming to work on for a few hours.
Please pop down to the bottom of the post for a quick C2C guide.
What you need to Crochet a Cowl
I used a variegated, colour changing yarn: King Cole Cotswold Chunky (80% acrylic/20% wool, 100g/130m per ball). You will need four balls in Broadway (2381), which should leave some leftovers, I used the leftover to make pom poms. I wish I had a photo of them against the cowl to show how lovely they looked!
A 5.5 mm (US I/9) crochet hook. If you find your fabric is a bit stiff try a 6mm.
Don’t forget a darning needle to sew in any ends and sew the ends of the cowl together.
Additional Info
Finished size: 43 x 40 cm (17 x 16 inches).
Abbreviations (UK terms – see notes below on swapping to US terminology): begbeginning, ch chain, ch-sp chain space, dc double crochet (US SC), prev previous, rep repeat, ss slip stitch, st(s) stitch(es), tr treble (US DC), yrh yarn round hook.
Tension Tension is not particularly important for this project. If after a few rows, the fabric works up a bit stiff, try going up a hook size to create looser stitches.
Special Stitches:TheCrab stitch This is used to snaz up the edging a bit. Essentially it’s a double crochet stitch worked in reverse. Crocheting from left to right can feel slightly skewy at first but once you have a consistent rhythm it’s actually quite good fun to do. And it’s quick! Here’s how to do it: Insert hook in the st to the right, yrh and pull through st, yrh and pull through both loops.
Notes
Make your cowl by crocheting a long rectangle and sewing ends together.
Once the main piece is complete, the crab stitch is added to both lengths before pinning out and steam blocking the fabric. (I like blocking as I think it improves most crochet but you can probably get away without doing it here).
1 block = 3ch and 3tr.
C2C is incredibly versatile and keeping the stitch plain showcases its beautiful texture. But there’s nothing stopping you from adding stripes of different colours, or how about adding a fancier border to give it a whole new personality?!
You can make it as long or as deep as you like by adding more rows before reaching the second corner. In addition, chuck in more rows before starting to decrease to the final corner.
The pattern is written in UK terms but, I promise, c2c is the easiest of stitch patterns to swap to US terms. Just remember that the main pattern is US double crochet stitches and not trebles. When you work row 1 of the edging, that’s a foundation of SC stitches you’re working, not dc.
C2C Crochet Cowl Pattern
Row 1: Ch6, 1tr in 4th ch from hook, 1tr in next 2 sts, turn. [1 block]
Row 2: Ch6, 1tr in 4th ch from hook, 1tr in next 2 sts, ss into the 3ch-sp of prev row, ch3, 3tr into same 3ch-sp, turn. [2 blocks]
Row 3: Ch6, 1tr into 4th ch from hook, 1tr in next 2 sts, *ss into next 3ch-sp of prev row, ch3, 3tr in same 3ch-sp; rep from * to end, turn. [3 blocks etc]
Row 4 -18: Rep Row 3. [18 blocks at Row 18]
Row 19: Ss along the first 3 sts and into the first 3ch-sp, 3ch, 3tr in 3ch-sp, continue making blocks in each 3ch-sp to the end, turn. [18]
Row 20: Repeat Row 3, ending with 1ss in the last 3ch-sp (ie. do not make the last block), turn. [17 blocks & dec by 1 block each row]
Rep Rows 19 & 20 six more times
Row 33: Ss along the first 3 sts and into the first 3ch-sp, 3ch, 3tr in 3ch-sp, continue making blocks ending with 1ss into the last 3ch-sp, turn. [17 blocks].
Row 34 – 49: Rep Row 33 (decreasing by 1 block per row).
Ss into each of the last 3 sts and into the corner.
Edging Work along the length of the piece. Row 1 (a foundation row to work the crab stitch into): Ch1 (does not count as a st), 2dc in horizontal bars of each tr, 1dc in each of the 3 vertical tr, do not turn. [80]
Row 2: Ch1(does not count as a st), crab stitch along to end.
Fasten off and reattach yarn to the other side. Rep Rows 1 & 2. Fasten off.
crocheting the crab stitch
Blocking and Finishing
For extra drape it’s good to block your work. Pin the crochet onto foam blocking boards, (I used to lay a towel down on the carpet to pin on that but please don’t do this because you might ruin your carpet or poshest towels). Then, using an iron or steamer, carefully steam block ensuring not to melt any acrylic fibres. Hold an iron too close to acrylic and you’ll have ruined all your hard work. Once it’s dry, fold it in half with the right sides facing. Then, using a mattress stitch or whip stitch, sew the short ends together. Turn right side out.
Voila! You now have a finished corner to corner crochet cowl to snuggle into! Wahey!
If you enjoyed this free crochet pattern, please feel free to check out some of my other free patterns HERE.
How to Crochet the C2C Stitch: A Guide
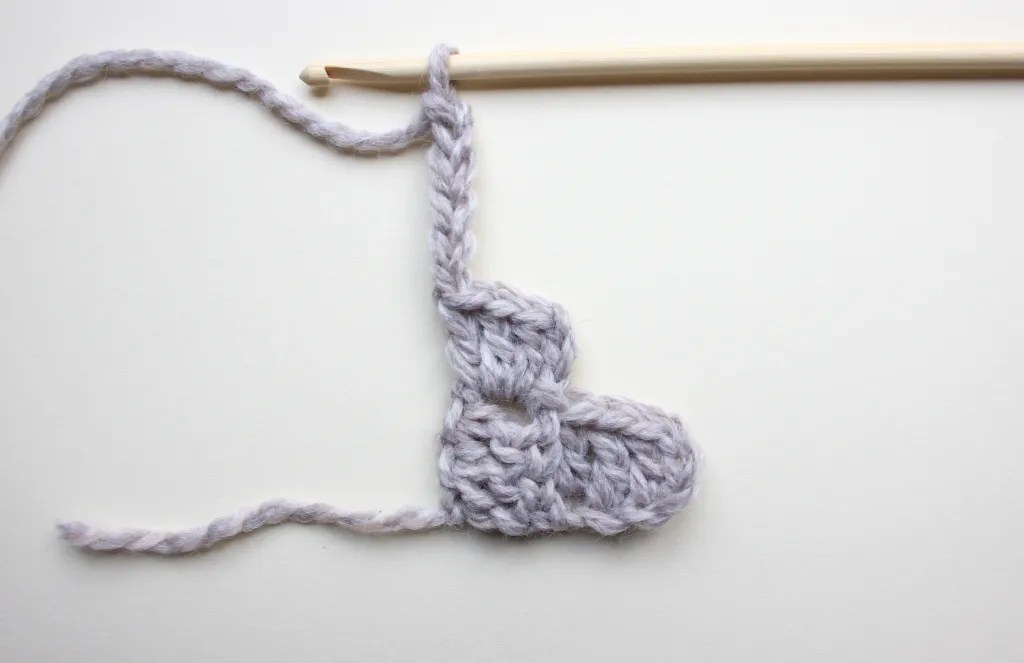
This is just a quick glance at the Corner to Corner stitch. I hope you can see that the C2C stitch is just about building blocks. As the name suggests, start in one corner, make loads of lovely blocks and then decrease to finish at the opposite corner.
Although it might look tricky, it is actually one of the easiest and quickest crochet stitches to work up. The down side though is that it is the very first few stitches that can discombobulate. I know cos I remember learning!
Basically, each block is made up of three chains and 3 UK tr (US dc) stitches. When building blocks row by row, the first block of the row is in an increase and worked into a chain of 6. Each subsequent block is then anchored to the work by slip stitching into a 3ch-sp of the previous row.
Once you have the width you need, you can either decrease from this point to create a square, or carry on working rows without adding a new block every row. Continue the increases but balance them out by ending one block early on the other end of the row (a decrease). This keeps the block count to the same number of blocks per row for as many rows as you need.
Decrease to the other corner by chaining 3 at the beginning rather than 6. Finish with the row with a decrease too, and make 3 slip stitches across and slip st into the neighbouring block’s 3 ch-sp to get to the start of a new row.
Clear as mud?!
If time allows I would love to record a tutorial for this one day. A super simple beginner’s vid. But in the meantime, I do have a video tutorial for a different c2c cowl (the Apres Ski hat & cowl set) I made a few years ago. It has colour work and I assume you know the basics when talking through how to make it.
Over the last couple of years, the popularity of mohair yarn (and other fluffy yarns) has grown monumentally. Creating the very best of halos, mohair is the ultimate in warm and fluffy yarn.
Yarny projects can be expensive due to the mix of fibres used (mohair is angora goat, with a blend of silk); costs can go stratospheric when holding the yarn double. Therefore, spending money on, and using mohair can take quite the leap of faith, especially when it’s not always the easiest to work with (hello frogging!). But it’s brilliant and totally worth the risk. Soft, warm and fluffy, the comfort levels are to the extreme!
My fave, holding mohair with a non fluffy yarn.
Alternative Yarns to Mohair
Mohair isn’t compatible with everyone. Affordability aside, it can cause allergies and itching, which is no fun at all. Fluffy yarn is fluffy yarn and the tips below apply to yarns that are other fibres too. Over the last few months, I’ve tried a few alternatives and you definitely can get the floof without using mohair. Alpaca is great and easily available. The yarns similar to mohair are often brushed alpaca. You can also get brushed acrylic, too but I’ve not tried that yet. The options are quite plentiful. Would a blog post about the ones I’ve used be helpful?
Anyway, if you have decided on a fluffy crochet or knitting project, then check out these useful tips…
Fluffy Yarn Top Tips
Frogging Yarn
Let’s start with a painful one because if you make a mistake in your project, then frogging (undoing all your beautiful stitches) is a frustrating and sometimes impossible process. If you find that you have to rip back your work, do it slowly. Really, really slowly. Never rip/yank/tug. Doing so will tighten the grip of all those flyaway fibres, and you will end up with a horrible knot. Or it will break because you’ve pulled too hard. Instead, slowly coax each stitch apart at a snail’s pace. It seems ridiculous but it’s worth being super patient over.
Lace-weight mohair on its own is hardest to undo. Chunky yarn is a bit easier. When held double with a non-fluff yarn, it’s almost tolerable! It’s best done “fresh,” the longer you leave it, the more likely it is that the fibres will felt together.
I’ve heard that putting it in a freezer before frogging helps, but I haven’t tried it.
Choose Simple Patterns For Fluffy Yarn
This tip helps to avoid any fractious frogging. Complicated stitches are easy to mess up and difficult to undo. The main star of the show when using fluff is the fluff itself; therefore, a simple garment or shawl shows off the yarn without any distractions.
Go Up a Hook/Needle Size
With all that crazy halo, stitches can be hard to see. So, for example, try a 5.5mm instead of a 5mm. A larger hook/needle is often required for mohair patterns anyway, but do play around to see what you prefer. I found it also creates a nice lacy look, too. Plus, the flyaway fibres sort of fill in gaps.
Hold the Yarn Double
After trying a few different ways of using mohair and brushed alpaca, I have discovered that this is my favourite way of using it. A gossamer lace-weight held with a merino 4ply or DK produces a beautifully soft fabric that feels super luxurious.
If I can get away with not using stitch markers in my crochet projects, then I will. I am lazy, life is too way short for undoing, moving, and rejoining a stitch marker. Or worse, multiple stitch markers! However, they are really useful for when stitches are hard to see. Use the stitch markers when working with mohair yarn!
Look At The Light!
As established, when working with fluffy yarn, it can be a pain to see stitches. A very simple trick is to hold your work up to the light. It is much easier to see crochet stitches this way (I think they’re more difficult to see than knitting stitches).
If you need to count stitches, for a gauge swatch, for example, add one stitch marker just before a stitch. Then, laying your swatch flat, measure 10cm (or 4 inches, if that’s what you use) from the stitch marker. Place another stitch marker there. Hold it up to the light and count. You can see each stitch clearly, where in other circumstances, they can be hidden by the floof they’re encased in. Do the same for rows.
Try Budget Yarn First
If cost is an issue, try a cheaper yarn to experiment with (and a smaller project ). If you like it and you’re happy, move on to bigger goals. The Drops brand have both mohair and alpaca yarns that are budget friendly. I recently made hair scrunchies with a yarn from Flying Tiger that was perfect for a cute hair accessory. It was about £2.25 for a ball of 25 grams (the standard sized ball for mohair yarns). I used a scrunchie pattern from Lottie & Albert’s new crochet book.
Trying different types of fluffy yarn. Going clockwise from the top: Mustard (“curry”) is Drops mohair, the green is chunky kid silk from MYPZ, lilac and peach both Flying Tiger, the Coral is brushed alpaca silk, the teal (“verdigris”) is Rowan Alpaca classic
Buy an Extra Ball of Yarn
If budget allows, it might be useful to buy an extra ball for swatching. When designing, I will buy an extra ball so I have the freedom to work up a few swatches without the fear of using up yarn that will go into the final sample. I can play around with hook sizes and stitch patterns to see what works and what doesn’t before getting stuck into the actual sweater or shawl.
Or, buy one ball first, swatch it and see if you actually want to use it before buying a sweater quantity! It might save a few quid if you learn that it’s a bit too scratchy against your skin.
Mohair Yarn Likes Simpler Stitches
This one is for those of you who might want to design with mohair, and it is personal preference rather than a hard and fast rule. With a larger hook size than normal the stitches work up looser and drapier. A loose single crochet stitch or perhaps an extended SC look really effective, much more than you might think. By all means, go for different stitches if that’s your aesthetic but the nature of the yarn is that it does the talking and overly intricate stitches confuse things too much. Think small, dainty stitches as opposed to treble heavy. Whatever floats your boat.
And those are some tips I’ve come up with from my adventures of working with mohair yarn. Oh, and alpaca fluff too! I hope you find them useful. Have you got any tips you’d like to share? Perhaps I’ve missed something that would be super useful to add. Let me know in the comments below!
There are plenty of knitting patterns for the fluffy stuff, but I haven’t seen as many designs in crochet. Take a look at 20 Crochet patterns using mohair yarn. Hopefully, you will be inspired!
If you would like to explore more patterns where I may or may not have used Mohair yarn, take a look at my Free Crochet Patterns page. And if you like what you see, why not explore my Ravelry store to find even more crochet patterns?!
For colourful things that aren’t crochet related check out Laura-Jane’s art at Zinome. There were no baubles this year but there’s lots of other stuff to fall in love with.
I bought my yarn advent from Loom Wool. Still deciding on the design I want to make with all those minis!
Other stuff you might be tempted to look up, go and explore Supergran, Crochet Cakes and Molla Mills
Thank you so much for all of your support over the last year. Cheers. x
Hello, how are you? Prepped and ready for a crochet Christmas, I hope?! We;come to episode 95 of the Zeens and Roger Crochet Podcast (I seem to have given up calling it a vlogcast and/or blogcast!)
For this episode please click on the pic above or pop over to my YouTube channel HERE.
Oh Christmas sweater, oh Christmas sweater, how lovely are your pixels!
Sweater? Jumper? Either way, here we have a free crochet pattern (borderline recipe) to satisfy your festive corner to corner compulsions.
I have finally managed to put together a video for you so that you can make your very own crochet Christmas sweater / Christmas jumper using the C2C crochet stitch. It’s super easy to make if you’re familiar with the corner to corner stitch. I would argue that this is an intermediate project and suitable for beginners who are patient and keen to learn a few new techniques.
Below, I have broken down all the essential info you need to make your own crochet jumper but please beware, I haven’t written this as a traditional pattern. It’s a guide, similar to the JW Anderson cardigan that I worked up last year. Actually, tell a lie, this one has waaaay more detail. The video tutorial is HERE. I have also created an ad-free PDF you can download including charts for 9 sizes. You can find that HEREon Ravelry and HERE on Etsy.
I am just over 5.7 and a UK size 12
Yarn, Hooks and other Things you Need
To make a jumper of your own, you will need Paintbox Woolmix Aran [this is an affiliate link so if you buy via the link I receive a minimum of 5% of the cost]. I bought 10 balls of the main colour for size 3, Vanilla Cream, and used nearly all of it! The numbers below are estimates based on the weight of the sample size.
Size
1
2
3
4
5
6
7
8
9
Est. yarn weight in grams
749
883
985
1005
1167
1230
1369
1540
1606
Balls needed
8
9
10
11
12
13
14
16
17
Also required are a few metres of each of the five contrasting colours for the motif section. You could always use just one colour for the motif if you don’t want to buy whole balls of each colour just for a few metres.
I used a 3.75mm hook. I have average tension. This hook, with this particular yarn, creates a closed fabric that is not so tight that it feels stiff.
Oh, and stitch markers are helpful. I use them to pin pieces together.
Ideally you want to print out the C2C colour chart. Grab a pencil for crossing off each row as you go.
A decent needle for sewing everything together is also required.
Grading & Sizing your own Crochet Christmas Jumper
It is pretty important to make sure your Christmas sweater is going to fit before picking up a hook and buying loads of yarn. Let me try and provide you with as many tools as possible to work out a size that will fit you.
The sample I made is nearest to a UK 12 but after a bit of wear I suspect it may stretch to a 14. I broke the rules and didn’t block! If you are in between sizes you may wish to make the smaller size.
First things first, it is a very good idea to work up a swatch. You can use this swatch to determine how many C2C blocks you’ll need to work. Bear in mind that every 6.5 blocks is a measurement of 10 cm (4 inches). This will help you work out how many C2C blocks across you need your jumper to be. Work up a C2C square that’s 12×12 blocks to ensure you have a decent amount of fabric to get an accurate measurement. To be fair, you might get away with 11×11 if you’re feeling lazy!
A useful trick is to find a favourite jumper and measure it. How many blocks will you need to get the same width and length?
Size
1
2
3
4
5
6
7
8
9
To fit Bust (inches)
28 – 30
32 – 34
36 – 38
40 – 42
44 – 46
48 – 50
52 – 54
56 – 58
60 – 62
To fit Bust (cm)
71 – 76
81 – 86
91.5 – 96.5
101.5 – 106.5
111.5 – 117
122 – 127
132 – 137
142 – 147
152 – 158
Width (back) in cm
41
47
53
59
65
71
77
83
89
Length in cm
50
52
56
52
54
54
54
56
56
Body Blocks across
29
33
35
37
39
41
43
45
47
Body Blocks down
27
27
29
29
29
31
31
31
31
Corner to Corner Chart
Stitchfiddle is such a good tool for creating crochet C2C charts. If you’re making a different size to mine you can find the charts in the ad-free PDF on either Ravelry or Etsy. Or try creating your own design chart. Be careful, chopping and changing design ideas is addictive and before you know it, you’ll have lost hours by fiddling about!
Corner to Corner Chart
Working the Corner to Corner Stitch
If you’re an absolute beginner, then this actually isn’t too bad of a C2C project. However, I do assume you have the crochet basics under your belt. I don’t plan on writing specific corner to corner instructions, instead, I demonstratehow to work a swatch in thevideo.
The basics of of corner to corner are that you build up each row one block at a time. When it’s time to stop building your blocks, you decrease until you reach the opposite corner. However, none of the pieces are exactly square. After building enough blocks to reach the first corner, you then work even by only increasing on one side to create the rectangle shape. Decreasing is my fave bit as it’s the race to the finish line!
Crochet Sweater Pieces
The pieces of your Crochet Sweater are made separately and sewn together.
Main body
The front and back are the same except for the colourful motif on the front. As you know from diligently watching all of the video, I made my front panel upside down to get the colour work done & dusted before the easy stuff could commence. This is why the charts are upside down.
Once you have the corner to cornering done, you can work a Join As You Go rib. I love this bit! Check out the video for the demo on how it’s done. I’ll try and remember to add the timestamps on YouTube for all these useful sections.
For the front piece I snipped the yarn from the main body piece and reattached to the right top corner. Work 3 sc in each vertical block and 2 sc in the bar of the stitch that lays horizontally. When working the back you can just turn, you don’t need to cut the yarn.
Snip again (both front & back) to reattach to the top right side. I think I decided on 11 stitches for the ribbing, so chain 12 to begin. All hdc (UK htr) sts are worked into the front 3rd loop of the st below.
Row 1: 1hdc in 2nd ch from hook and the rest of the chains to end, slip stitch in next 3 stitches of main body, turn to work back up the ribbing.
Row 2: Miss 3 sl sts, 11hdc in front 3rd loop of sts, turn.
Row 3: 1ch, 11hdc in front 3rd loop of sts, sl st in next 3 sts of main body, turn.
Rep Rows 2 & 3 across. You might end on Row 2 or Row 3 depending on how many stitches your foundation row is. It doesn’t matter which!
Sleeves
My sleeves (size 3) are 23×28 blocks. Look at the chart below and you’ll see how many blocks wide to make your sleeves. Don’t worry too much about sleeve length for different sizes. I often make the sleeves the same length across several sizes because our arms aren’t drastically different in length. If you know you have shorter arms, or they’re longer than average, then allow for that, add or remove a row. However, you will want wider sleeves if you’re after a bigger jumper.
Size
1
2
3
4
5
6
7
8
9
Sleeve Length (from under arm to wrist) in cm
48
48
48
48
48
48
48
48
48
Sleeve depth at underarm in cm
18.5
21.5
21.5
21.5
25.5
25.5
29.5
33.5
33.5
No. of Blocks for sleeve length (cuff not inc)
23
23
23
23
23
23
23
23
23
No. of sleeve blocks across (total)
26
28
28
28
32
32
38
42
42
Cuffs
Make 2, obvs. I worked a foundationless chain of 25 stitches and worked 22 rows in hdc (UK htr) in the front third loop. It’s in the vid but you can also find the foundationless start HERE as a separate video tutorial.
My wrists are a skinnyish 14cm circumference. Add 2 rows for every centimeter.
Sew the cuff ends together to get them ready to ease into the sleeve.
Waistband
Whatever your size jumper, make the waist band approx 10cm (4 inches) smaller than the circumference of the main body of the jumper. Reducing the circumference here brings the jumper in to create a bit more shaping. I worked 11 stitches for 120 rows of ribbing for my size 3, hold it up against the main body to check you’re happy with the length of yours. This was very much an eyeballing task.
Work the ribbing in one length to go around the circumference of the jumper, then sew the ends together.
Corner to Corner Christmas sweater
Jumper Construction
All your pieces are finished, now it’s time to put it all together. So near yet so far! Exciting stuff!
Make sure all sewing is done on the wrong side of your jumper. Pay attention. Double check. Triple check that right sides are facing each other. It is guaranteed I will get this wrong at least once in any garment I make! Unpicking is par for the course for me but please try and do better than my efforts!
Below is a visual image of the steps of construction. Basically, sew the shoulders together first. I went for 10cm at each shoulder tab and I’m happy with that. More or fewer stitches will be required depending on what size you make.
Then sew the open sleeves to the shoulders. I don’t need to spell it out to make this evenly, equally spaced and at the centre of the shoulder. Fold the whole lot over, right sides facing, so you can sew the arms and body together. Voila!
Next up is to attach the ribbing on the sleeves and waistband.
For the sleeves, gather them at the wrist by creating a foundation round of sc stitches (UK dc) around the opening. Work 1 sc over each bar of the horizontal dc (UK tr) stitches and 2 sc into each of the vertical blocks. This brings in the sleeves a bit to make it easier to attach the ribbing. Then use plenty of stitch markers to hold the cuff in place whilst you sew it on. You will probably find the video useful for this bit.
Easing in the waistband is far easier. Use stitch markers to hold it in place here too.
I forgot to draw the neck ribbing on the top two pics. It’s supposed to be there. Sorry!
Overview: How to Crochet a C2C Sweater
Much like the GB Bake Off final, I have taken away some of the instructions. Please refer to the charts to determine how many blocks across & down you need to work to make your size. And watch the video to see how to make everything! Purchase the ad-free version on Ravelry or Etsy.
Step 1: Make a gauge swatch! 12×12 blocks should do it.
Step 2: Make your C2C pieces – 1 back, 1 front (both the same number of blocks), sleeves x2.
Step 3: Add join as you go ribbing to the tops of the main body – see video tutorial.
Step 4: Make ribbing for cuffs and waistband. Work the waistband so that it’s roughly 10cm (4 inches) shorter than the main body of your jumper.
Step 5: Sew shoulders together.
Step 6: Sew sleeves to shoulders.
Step 7: Fold in half, right sides facing, sew along sleeves and down body, both sides.
Step 8: Add the foundation to the sleeves and ease in the cuffs.
Step 9: Ease in waistband. There’s no need for a foundation round here.
Step 10: Blocking? You can if you want. A light steam block is my recommendation but I’m going to let the wearing of it do the job.
The End
How did you get on with your C2C Christmas sweater!?