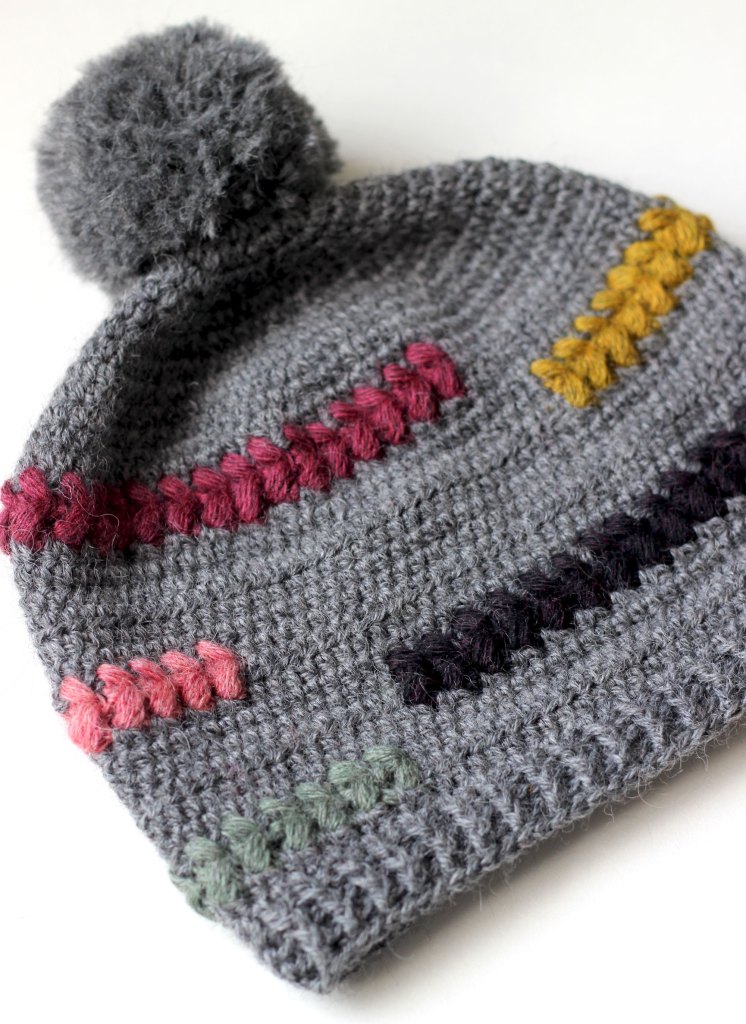
Free Crochet Pattern. Ribbed Mohair Hat

I don’t need a new crochet hat, I have plenty of hats, but when is that ever an excuse? As a crocheter compelled to make stuff, hats are pretty good palette cleansers in between more complex projects. They are also great stash busters and I am definitely a fan of a decent stashbuster.

The idea behind this crochet hat is to use my pretty leftovers of mohair yarn from all the fluffy adventures I’ve been on over the last couple of years.

Before you read on for the pattern and its details, I have also made a YouTube video tutorial, which you can find HERE. During the editing process I noticed that I tell everyone I used a 4.5mm hook to make the hat, I didn’t. I used a 5mm. Please ignore “Tutorial Zeens”, she doesn’t know what she’s talking about. Well, mostly she does, everything else is good information….

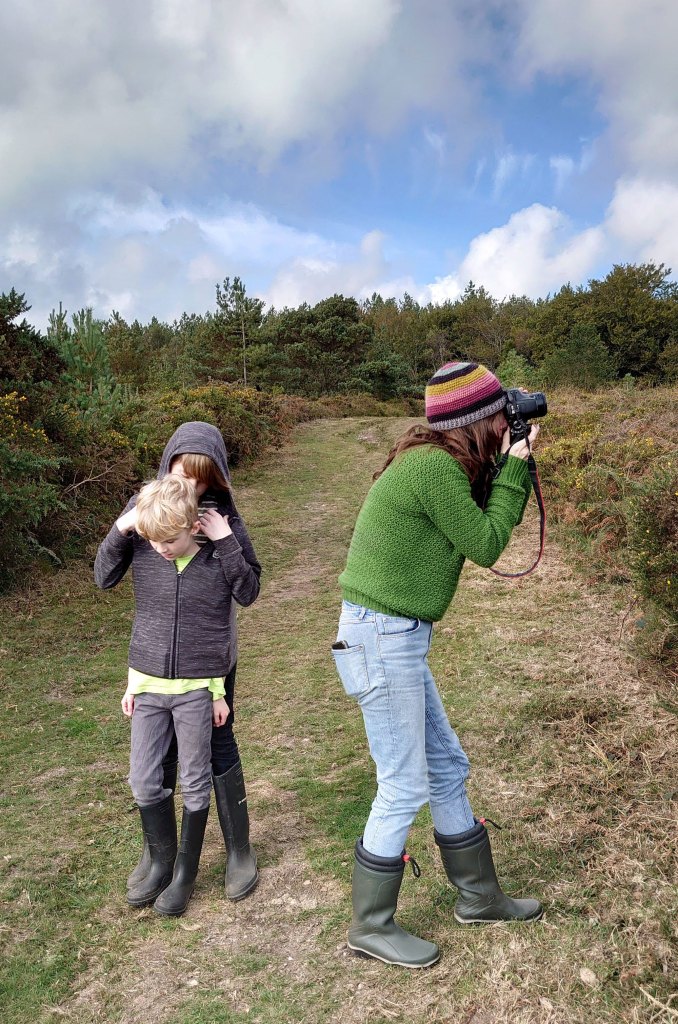
On a family Sunday walk, wearing my stashbusting crochet hat.

Notes on Making your Crochet Hat

making a rib stitch crochet hat

A Crochet Rib Stitch

I wanted to keep things simple but also use the best kind of crochet rib stitch. There are lots of hats crocheted in this kind of method but often I see a half treble (US half dc) worked in the back loop only. I love a htr back loop only but not for a rib. There are better options that are tidier and more effective, like the one I’ve used in this pattern.

For this hat I opted for a yarn over slip stitch (YO sl st) worked in the back loop only (BLO). It worked just as I wanted it to. It’s a stitch that would look great in fishermans’ rib style jumpers (must make one of these).

Please watch the video tutorial for a stitch demo. It’s one of those stitches that’s a little bit fiddly when you’re just learning but once it becomes a rhythm, it’s actually quite fun to do.

The stitch goes like this: Yarn over (YO), and insert hook into the stitch, yarn over and pull through all loops on hook.

Ribbed stitch crochet hat

The Yarn

The main yarn I used was a DK merino held with a laceweight kid silk mohair. If you have never used mohair yarn before but fancy giving it go, check out my tips of using mohair yarn.

The blips of contrast colours were a selection of all fluffy yarns in my stash leftover from previous projects. Mine range from laceweight to DK weight to chunky.

You can get fluffy yarn across all budgets and I threw everything into this hat regardless of weight or brand. The Christmas before last I made mohair and brushed alpaca scrunchies for my nieces. The leftovers are in this hat. The summer of that year I made a colourful cardigan out of MYPZ chunky mohair. (oh lordy, I called it DK in the video – another mistake!). I also had fluff from other projects too. Let’s chuck it all at the hat!

The colour changes are pretty lazy. Working with two strands all the time, whenever I wanted to introduce a new shade, I popped the one I didn’t want out of the way and laid a new strand with the one still in use. Then I swapped back when the contrast colour ran out, or whenever it felt right. When not in use, I floated most of the main colour across the wrong side of the work. Sometimes, if they were overly long, I’d snip them and rejoin later.

Crocheting a Hat to Fit

I worked 70 rows of 40 stitches. The piece of fabric measures 23 (the hat’s depth) x 47cm (the hat’s length). My head measures 56cm, which is quite a few centimeters more than the length of the hat. This is because you need negative ease in a hat so it stretches to fit. Standard negative ease is about 5-6cm for a hat. Mine is a little more than that as it will stretch out further upon wearing. Essentially my own head is “blocking” it out as I wear it.

Blocking? Simply put, blocking means to wash or steam your woolly items and then (gently or aggressively) stretch out the item as it dries. It will then be fixed in its new state. I have no intention of properly blocking the hat. I have no intention of washing the hat at all (unless it falls into a muddy puddle or something) so I don’t think blocking is too urgent. It depends on your own personal preference for a project like this. Yes, a gentle steam block will even out stitches. And yes, it will create additional length and width by being stretched out. It depends on how particular you are as to whether you want to do it properly. This is a quick win crochet hat so I’ve just eyeballed it.

By all means, if you’re a harcore perfectionist, make up a swatch, wash it and leave to dry. You can then measure how many rows and stitches there are over 10cm (4 inches). From these measurements you can work out Gauge.

Here’s my unblocked gauge: 18 sts and 15 rows per 10cm. It varies a little bit here and there when the different weights of yarn are applied.

Crochet Ribbed Mohair Hat Pattern

Things You Need

  • 100g of DK yarn, I used West Yorkshire Spinners “Bo Peep”, which comes in 50g balls.
  • 25g kid silk mohair, laceweight. I used Drops.
  • Lots of different contrasting colours of various mohair, brushed alpaca, or similar.
  • You will need extra of everything for the pompom. If you’re shopping for the whole shebang, add 3x 50g dk and 2x 25g laceweight to your shopping basket for the main body of the hat.
  • 5mm hook. This is me going up a hook size than I’d normally use. I found it too fiddly to get the hook into the Back Loop Only (BLO) with a smaller hook.
Crochet hat in a gorse bush.

Hat Pattern

Chain 41
Row 1: In the second chain from hook YO sl st, YO sl st to end, turn. [40 sts]
Row 2 – Row 70 (or however many rows you need for a bigger/smaller noggin): 1ch, YO sl st BLO to end, turn. [40 sts]

This finished piece measures approx 23 x 47cm.

When changing colours, ensure ends are all on the “wrong side”. I didn’t worry about sewing them in. I am going to let their flyaway fibre structure do the work for me. Mohair never wants to let go so I’m pretty sure none of these contrast colours will work themselves loose. If in doubt, feel free to tie ends together before tidying up the ends with a pair of scissors.

When you fasten off, leave a long tail for sewing. Sew up the side using a whip stitch, do this wrong side out. I have demonstrated a way of doing this in the tutorial that ensures it’s pretty much invisible. Using the same length of yarn, run the needle along the top circumference of the hat, going in and out of the rows. Gently but firmly pull to close. Then, secure everything in place by working the needle around the gathers, back and forth, again and again to lock it all in place. Tie off but don’t snip just yet.

Crochet hat

Tiddly Om Pom Pom

I am not going to write a step by step process for pompom making. I am not good enough! But you will hear my delight in the video tutorial when I made the one for the hat. I have every confidence that you will be better than me at making a pompom. But at least I didn’t break the yarn this time. Be careful when tying off the pompom as I have a tendency to break the yarn by pulling too hard!

When attaching your big fluffy sphere to the hat, be firm with the tying so the pompom won’t loosely flap about atop your head. Once secure, I also tied all loose ends together and then snipped to trim rather than sew them in. No one has time for that, especially you aren’t going to see them.

If you don’t want to make a fool of yourself like I did you can always buy a ready made one?

Mohair hat

Alright me Ansome?

Ansome, a crochet hat

Well, hello and good day! Or, if you’re from the West Country, alright me ‘ansome?!

There are unsubstantiated rumours that the Ottery St Mary born poet, Samuel Taylor Coleridge would often greet people with “Alright, me ‘ansome” as a way of saying hello. Whether he actually addressed people with this local greeting is a mystery; it’s fun to think that he might have but my money says it’s a made up lie!

Ansome is a crochet hat pattern that is essentially two hats in one. Having made a hat with my new obsession, the puff stitch, I had plenty of yarn left to make a second hat. Both hats start with the same pattern but end up as two different styles.

The written pattern for Ansome is available on Ravelry HERE and Etsy HERE. There is 25% off until the last day of November.

Crochet Puff stitches

Ansome is now available on Ravelry & Etsy but it has been a couple of months in the making. For a while I have been sketching lots of designs using different sorts of crochet puff stitches. The first idea came to me at the beginning of the year. That one turned into the Wheatfields shawl, which is now a fully fledged pattern in its own right. You can find it HERE and HERE. It’s a fabulous combo of hand dyed 4 ply merino and lace weight mohair.

Working up puff stitches is really calming and rhythmic and they are awesome in all kinds of projects. They look fancy but are relatively fun and easy to do. However, do make sure you have a good crochet hook. I used a Knitpro hook, which is not normally my first choice as my hands are too big for the short handle, but it does have a good hooky bit! It helps when pulling through all the loops so try some out before you begin your project.

Potentially there are more puff stitch designs waiting in the wings for me but I think I will revisit those next year. For now I’m happy to focus on these crochet hats, which have come together in a way that felt like a breeze. They’re just meant to be!

The Wheatfields shawl also uses the crochet puff stitch

Devonia Yarn

We’re in November now and headed towards chillier weather in the northern hemisphere. When is a better time to release a hat pattern!? It has worked out quite nicely; I don’t think I had any intention of coming up a hat design. It wasn’t on my list of things to do but sometimes things just work out that way.

The catalyst was a single picture shared on Instagram. I saw a collection of Devonia mini skeins from John Arbon Textiles and fell a little bit in love with the colours. Instantly I knew they should be a crochet hat. So I made one!

Devonia is what I call a proper woolly wool. Warm, comforting and with the essential sheepy smell that I could breathe in all day. It’s a combination of Bluefaced Leicester (an all time fave) and Blueface Exmoor (from Devon, proper job). It also has Wendsleydale & Romney lustre breeds, which, if I’m right, add the shiney sheen that I always think looks super pretty and works really well with crochet.

I am very lucky in that, when I left a comment on the IG pic, to say it was a stunning combo of shades, the super smashin team from JAT asked if I would like to try them. This doesn’t happen everyday. I have no idea why they are willing to support my crochet adventures, I just know that I am very grateful to get the yarn support. Thanks Sonja!!

Maybe it is because it isn’t the first time. Remember the Grainbow shawl from a couple of years ago? And the infamous Dreckly mittens? That’s a triple whammy of JAT yarns: Knit By Numbers, Yarnadelic, and now Devonia! How about Harvest Hues next!?

Devonia comes in DK and 4 ply weights, and 25g minis and 100g skeins. That is one of the best things about JAT yarns, lots of options and versatility. For Ansome, you need 100g of DK for the main colour plus your colourful minis for the contrasts. Oh and I almost forgot! One of the reasons that the guys were sharing Devonia pics is because there are news shades that have just been released. I used Wood Smoke as my main colour, which is one of the new ones.

Dreckly mittens
The Grainbow Shawl

Crochet Hats

Having that much yarn meant there was too much left over to do my usual trick (hide it in the cupboard and struggle for stashbusting ideas). There was only one thing for it, if JAT can have all the options, so can I! Ansome mainly refers to the star of the show, which is the puff stitch hat but the remaining yarn was calling out too. It wanted to be striped up as a “plain” crochet hat. So there are two patterns here and you can make both!

The pattern has three size options and there’s freedom to add more rows if you want extra slouch. I made the medium size for both hats and the puff hat has just a little bit of slouch as there are more rows. A few subtle changes like that and you have two different styles of crochet hat! How good is that?!

The puff stitch hat was blocked too, and that added to the drape. Unsure about blocking crochet hats? I certainly was. So I did what I normally do and guessed. I blew up a balloon inside Ansome to what seemed like my head size and then gave the hat a light spray of water. Once it had dried, boom, perfect hat!

Crochet Hats

The End

And that is pretty much all you need to know about these new crochet hat designs! Can you think of anything you’d like to know? If so, please do get in touch. In the meantime check them out of Ravelry HERE and Etsy HERE.

Ta very much. I would end by using a Devon way of saying goodbye but I can’t remember any phrases.

The striped crochet hat
Ansome ‘at

Crochet Bucket Hat – A Free Pattern & Tutorial

How to Crochet a Bucket Hat: click the pic for the YouTube tutorial

A Crochet Bucket Hat

The promise of summer is here! To celebrate, how about a crochet hat pattern!? Using just one roll of raffia, you can make a straw hat that’s perfect for protecting yourself from summer sun.

An impulse purchase has led to me having a roll of Wool and the Gang’s Ra Ra Raffia sat in my stash for about two years. I thought that one day inspiration might strike for it to become a cute clutch or little tote. Nope, it was a hat that won out in the end. This was due to some fine weather that was forecast for last weekend. A beachy time in Cornwall beckoned and I needed a hat! Alas, the hat wasn’t finished in time for Cornwall; such a shame because photos against a backdrop of sandy beaches would have looked awesome (although I did get some fab photos of my Perfect Cardigan)! Actually one version of the hat did get finished in time but I ended up frogging it half way down the A30. It was too big.

The tangled ball of papery yarn did not look quite so fancy anymore. Thankfully, it worked just as well after being ripped back. With some tweaks and adjustments, the second hat was completed yesterday and it fits like a dream!

Frogging on the A30

Seeing as I’m off work this week I have found some time to film a crochet hat tutorial and write up the crochet pattern. It’s called the Bucket hat because that is exactly what it is! Other name suggestions were “Kick the Bucket” and “Bargain Bucket.” Not sure either of those are the best names though…. What about the Blossom Bucket? Did you watch Blossom on telly back in the 90’s?! That’s a blast from the past!

Yesterday was a beautifully sunny day so me and the boys took a stroll down to the river for a few snap shots. The eldest was paid a few quid to be a photographer for me. Unfortunately, there aren’t many river pics included here because the river’s beaches were busy with loads of people. There was lots of joyous laughter and cheerful frolics going on. Those guys were definitely making the most of the first day of June.

The boy did a great job as chief photographer; he didn’t seem to mind when more shots and more angles were demanded. But I guess you don’t want a massively long story and to be honest, it doesn’t need one. So here follows the pattern….

Next book on the reading list. Haven’t started it yet.

To make a bucket hat, you need:

  • 1 roll of Ra Ra Raffia in Desert Palm (affiliate link).
  • 4mm hook
  • Stitch marker or 2.

Notes & tips

  • The pattern is written in UK terms but, honestly, it’s dead easy to convert: UK htr stitch = US hdc. UK dc = US sc.
  • My head measures 57cm – about average I guess…
  • Every two stitches measures approx 1cm.
  • You can make a hat smaller by missing out the last increase round, this will reduce the size by 4 sts.
  • You can make your hat bigger by working an extra (4 st) increase round.
  • Raffia has a bit of stretch to it. If it feels slightly tight at first, worry not, it will give after wear.
  • Made top down, the hat is worked as a spiral, increasing as you go.
  • Use the stitch marker to note the first st of each round, move after each round.
  • Watch the YouTube tutorial HERE.
Channeling the 90’s with a Blossom style hat!

Crochet Bucket Hat Pattern

  • Rnd 1: 8htr into a magic ring.
  • Rnd 2: inc around – 16 sts.
  • Rnd 3: *1 inc, 1htr; work from * 8 times – 24 sts.
  • Rnd 4: *1 inc, 2htr; work from * 8 times – 32 sts.
  • Rnd 5: *1 inc, 3htr; work from * 8 times – 40 sts.
  • Rnd 6: *1 inc, 4htr; work from * 8 times – 48 sts.
  • Rnd 7: *1 inc, 5htr; work from * 8 times – 56 sts.
  • Rnd 8: *1 inc, 6htr; work from * 8 times – 64 sts.
  • Rnd 9: *1 inc, 15htr; work from * 4 times – 68 sts.
  • Rnd 10: *1 inc, 16htr; work from * 4 times – 72 sts.
  • Rnd 11: *1 inc, 17htr; work from * 4 times – 76 sts.
  • Rnd 12: *1 inc, 18htr; work from * 4 times – 80 sts.
  • Rnd 13 – 22: htr around with no increases.
  • Rnd 23: Repeat rnd 3 – 120 sts.
  • Rnd 24- 27: htr around with no increases. (Any more rounds than this and the brim will curl in on itself).
  • Finish by making 3dc stitches followed by 3 slip stitches. Fasten off and weave in ends.
Half way hat. Before the brim was started. Finger indicates last increase round.
Crochet Bucket Hat
Side view of a crochet bucket hat.

And That’s it!

Such a quick and easy hat to crochet! You can wear it with the brim turned up or turned down. I added four rounds to the brim in the end. However, it did look good with just three rounds. Try playing around with different rounds to see which you prefer. This sort of hat is very forgiving (I am a big fan of forgiving crochet, it hides a multitude of sins!).

OK, I think that’s it for now. I will let the photographs below do the talking. But before you scroll on, if you enjoyed this fabulous pattern, please support my crochet work by buying me a Ko-fi or, check out my Free Patterns page. Cheers x

Don’t forget to share your makes on Instagram #zeensandroger

Subscribe to Blog via Email

Enter your email address to subscribe to this blog and receive notifications of new posts by email.

Crochet a hat for summer
Not quite Blossom
Crochet Bucket Hat
Tiny dot of a buzzard
Making hay whilst the sun shines
A crochet hat ready for summer sun
Zeens and Roger crochet bucket hat

Made it this far? Haha, well done!! But also, thank you. xxx

Crochet Catch up. October.

tunisian-crochet-cowlI may as well start with more pictures of me! (I know why I keep having to do this, it’s because I keep making hats and scarves that have to be worn to show what they’re like). I promise it really isn’t going to be a regular occurence.

cosy-cowl-tunisian-crochetIt’s my Tunisian crochet cowl, which is a fabulous free pattern by BHooked. Once I got stuck in it took next to no time. I wrote about the beginnings of it a couple of weeks ago. I’m wearing it right now, I’m absolutely freezing. I used different colours to the original pattern. I ordered mustard and barley Lionbrand, Wool Ease Thick and Quick from Woolwarehouse. When I first put it on it was quite stiff even though my tension couldn’t have been that tight (I would have had loads of yarn left over if it was too tight and I didn’t). It’s sitting a lot better now that I’ve worn it a few times.

green-crochet-puff-stitch-hatTo go with my new snood/cowl, I made a hat with Drops Big Merino. The pompom matches the cowl but the cat found it and has mauled the hat slightly. I came down stairs the other morning to find lots of mustardy worms sprinkled on the carpet. She does love a pompom.

twatCan I get away with this combo? I’ll at least be warm!

crochet-kitty-purseI finally got this made. A cute kitty purse by Nicki Trench (from the book Cute and Easy Crochet). It had been sat waiting (half made) for a few weeks. I was gearing myself up towards getting out the sewing machine. The thought of dragging it out from the cupboard under the stairs and then setting it all up was a bit of an effort (so lazy). I thought it’d be better to wait until I had a few sewing jobs and get them all done at the same time. Mine looks more like a mouse but, whatever.

cute-crochet-kitty-purseIt has been posted to my niece whose birthday was in the middle of August. Seeing as she’s only two I didn’t think she’d notice that it was a momentarily delayed.

cat-fabric-liningThe lining is my favourite! More kitties! It’s from Fabricland. I bought it a year or two ago but I think they still sell it.

cat-and-kittyMarceline is always nosey. She came over and sat on top of all the crochet.

stupid-faces-in-my-crochet-geoffrey-scarfSorry, more selfies. I had no idea how tricky it’d be to take a picture of a scarf! The angle you need to get it all in! This is the Geoffrey Scarf by Potter and Bloom.

my-crochet-geoffrey-scarf-by-potter-and-bloomIsn’t it lovely?! I watch podcasts every now and again (they’re vlogs really but podcast seems to be the word that has caught on) and I have recently found one by Potter and Bloom. I have now stalked Emma everywhere: You Tube, Twitter, Instagram, Ravelry, her blog; I have probably made quite a nuisance of myself. But it has paid off because when she asked for pattern testers for her Geoffrey scarf I was there shouting “pick me, pick me”. I spent last weekend scrutinising every last word, number, asterix of the pattern… It was like a really weird crochet exam.

sausaged-geoffI have never read a pattern so intensely in my life. I wanted to do it properly though. I thought it’d be a doddle; it was only a scarf! I thought I’d get it done and dusted in a few hours. It was actually a lot of work. It was a good experience though and I’m glad I’ve done it. It also turned out that I was the first of a handful of testers to finish. That means I get a lovely gift of Paintbox yarn from Emma! I’ll report back on that another day.

middle-motifs-of-geoffreyThere’s a nice intersection of motifs in the centre of the scarf. When it’s wrapped around your neck they sit nicely at the front. My middle motif looks like an eye. It’ll be staring at whomever I talk to when I’m wearing it. Except for it won’t. I’m not keeping it, I’m putting it aside as a Christmas present. I’ve got my chunky Tunisian cowl!

geoffrey-scarf-by-potter-and-bloom Should I add tassels to the pointy ends, or leave it as it is? I think Emma decided to leave hers, she had pondered over the idea of pompoms.

geoffrey-on-the-stairs-crochet-scarf-by-potter-and-bloomIf you’d like to hear more about the Geoffrey scarf, pop over to You Tube to watch Episode 10 of Potter and Bloom’s podcast. Just before the six minute mark is the part where my fellow testers and I are mentioned. And If you watch Episode 9 just before the 27 minute mark she starts talking about yarn for a shawl. Yeah, that was my joke!! How exciting to be mentioned! I was watching the podcast whilst cooking the tea (sausage and mash!) and had to “rewind” as I hadn’t been quite sure I’d heard right. But you should watch all of them! Not just the bits I’m in!

And there have been so many other exciting things happen this week. It has been ridiculously busy… A winner for the Take Care Mohair Giveaway was picked yesterday (that was over on Instagram), I’ve been to an event run by The Creative Business Network to get a massive injection of motivation (the artist Sarah J Perry gave a talk on Imposter Syndrome) and I’ve actually been writing out some new crochet patterns. It all feels great! But I must get on, I need to continue writing patterns. I forgot that it’s half term next week, which means I lose time I thought I had!